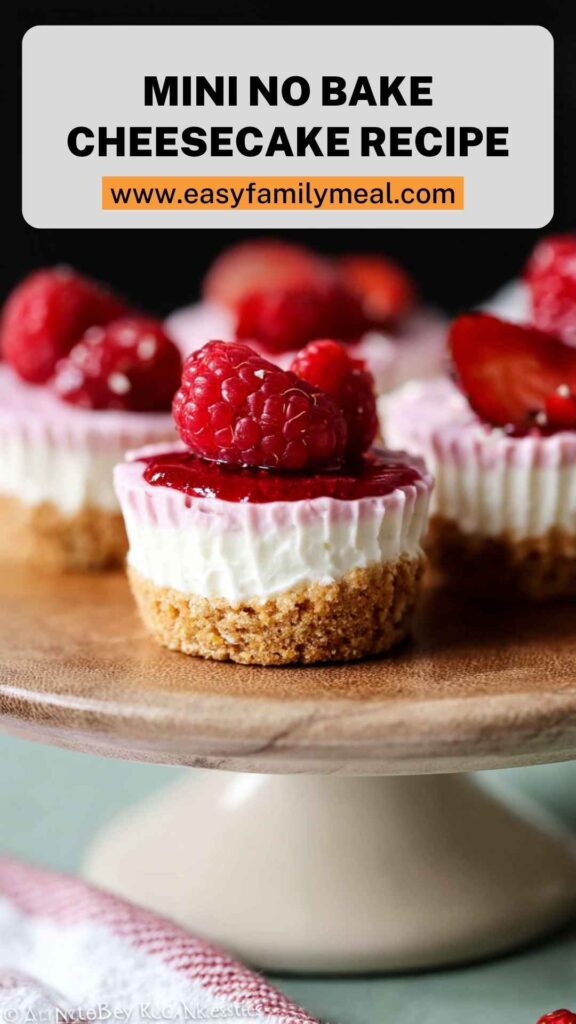
When it comes to desserts, mini no bake cheesecake is a fantastic choice. Its creamy texture pairs well with a variety of toppings and side dishes. Fresh berries, such as strawberries or blueberries, add a bright, juicy contrast.
A drizzle of fruit preserves can introduce a sweet tang, while a side of hot coffee or herbal tea complements the richness of the cheesecake perfectly. Elevate your presentation by serving these little delights on a platter with colorful fruits and mint leaves.
Imagine the vibrant colors playing against the golden crust and creamy filling. It’s not just a dessert; it’s a feast for the eyes.

What is Mini No Bake Cheesecake?
Mini no bake cheesecake is a compact version of the classic dessert. The beauty of this version lies in its simplicity. You don’t need an oven; instead, you mix, layer, and let it chill.
The crust typically consists of crushed graham crackers and butter, while the filling is made from cream cheese, whipped cream, sugar, and flavorings. These little cheesecakes are perfect for parties or quiet evenings at home.
It’s cheesecake without the fuss.
What is the Flavor Profile of This Dish?
When you take your first bite of a mini no bake cheesecake, you’ll notice a symphony of flavors. The cream cheese filling is creamy and rich, with hints of vanilla and a touch of lemon giving it a fresh brightness. If you sprinkle cinnamon, it adds warmth and depth.
The graham cracker crust brings a subtle sweetness and crunch that contrasts beautifully with the smooth filling. Top it with fresh berries or fruit preserves, and you’ll have a perfect blend of flavors—sweet, tangy, and utterly delightful.
Why You’ll Love This?
There are many reasons to love mini no bake cheesecakes. First off, they’re incredibly easy to prepare. If you can stir, you can make this dessert. They also look stunning on any table, bringing a touch of elegance to casual gatherings.
Plus, they’re versatile.
You can customize the flavors, toppings, and even the crust. Whether you’re celebrating a birthday, hosting a summer BBQ, or just need a sweet treat, these little gems are sure to impress.
Ingredients
Here’s what you’ll need to whip up these tasty mini no bake cheesecakes.
Filling
- 1 cup chilled heavy cream or whipping cream
- 16 ounces full-fat cream cheese, softened to room temperature
- 1/3 cup granulated white sugar
- 2 Tablespoons sour cream or plain yogurt, at room temperature
- 1 teaspoon fresh lemon juice
- 1/2 teaspoon pure vanilla extract
- 1/4 teaspoon cinnamon (optional, for added flavor)
Graham Cracker Crust
- 2 cups crushed graham cracker crumbs (about 16 full graham cracker sheets)
- 1/3 cup firmly packed light or dark brown sugar
- 1/2 cup unsalted butter, melted
- Topping: Fresh berries or fruit preserves (optional)

Step-by-Step Instructions
Let’s break this down into easily digestible steps.
Step 1: Prepare the Crust
Start by mixing the crushed graham cracker crumbs and brown sugar in a medium bowl. Stir in the melted butter until everything is combined.
The mixture should resemble wet sand. Take a mini cheesecake pan or individual serving cups, and press the crumb mixture firmly into the bottom. You want a solid base, so don’t be shy with the pressure.
Step 2: Chill the Crust
Place the crust in the fridge for about 10-15 minutes. This step is crucial. Chilling helps the crust firm up, making it easier to fill without crumbling. While it’s chilling, let’s move on to the filling.
Step 3: Make the Filling
In a large mixing bowl, beat the cream cheese until it’s smooth and creamy. You can use a hand mixer or stand mixer for this part.
Gradually add the granulated sugar, sour cream (or yogurt), lemon juice, and vanilla extract. Mix until everything is combined and smooth. If you’re adding cinnamon, include it here.
Step 4: Whip the Cream
In a separate bowl, whip the chilled heavy cream until soft peaks form. This step is vital. The whipped cream will give your cheesecake its airiness.
Gently fold the whipped cream into the cream cheese mixture. Be careful here; you don’t want to deflate the whipped cream.
Step 5: Fill the Crusts
Once your crusts are chilled, spoon the cheesecake mixture into each cup or mold. Fill them to the top and smooth the surface with a spatula. Now, it’s time for the hardest part: the waiting.
Step 6: Chill Again
Let the filled cheesecakes chill in the refrigerator for at least 4 hours, ideally overnight. This helps all the flavors meld together and allows the cheesecake to set properly.
Step 7: Top and Serve
Before serving, add your favorite toppings. Fresh berries or a drizzle of fruit preserves are excellent choices. Get creative here! Serve these mini cheesecakes for a truly delightful dessert experience.
Tips & Tricks
Here are some handy tips to elevate your mini no bake cheesecake game:
- Use Full-Fat Cream Cheese: For the best flavor and texture, opt for full-fat cream cheese. The richness makes a significant difference.
- Chill Your Bowls: If you chill your mixing bowls and beaters before whipping the cream, it will whip up faster and get fluffier.
- Don’t Overmix: When combining the whipped cream with the cream cheese base, fold gently. Overmixing can cause the filling to lose its airy texture.
- Experiment with Flavors: Don’t be afraid to switch up the flavors. Add a splash of almond extract or some cocoa powder for a chocolate version.
- Go No Sugar: For a healthier option, you can use a sugar substitute to lighten up the dessert while maintaining sweetness.
How Can You Store This Mini No Bake Cheesecake?
To store your mini no bake cheesecake, cover the cheesecake with plastic wrap or foil. Place it in the refrigerator, where it can keep its freshness for up to five days. If you have leftovers, you can also freeze them.
Just make sure to wrap each cheesecake well to prevent freezer burn. They can last up to three months in the freezer. When ready to enjoy, simply thaw in the refrigerator overnight.
Alternative Ingredients
Sometimes you find yourself missing an ingredient. Here are some substitutes you might consider.
- Graham Crackers: If you don’t have graham crackers, try crushed digestive biscuits or vanilla wafers. They’ll give a different flavor but a similar texture.
- Sour Cream: If sour cream isn’t available, plain yogurt works nicely. It adds tang without compromising the texture.
- Cream Cheese: For a lighter option, you can use mascarpone cheese. It’s a bit sweeter and gives a delicious creaminess similar to cream cheese.

Conclusion
These mini no bake cheesecakes embody effortless elegance and delightful flavor. They require minimal time and effort while delivering maximum enjoyment. By following the steps and tips, you’ll find that this dessert can become a go-to in your recipe collection.
Whether you serve them at a party or enjoy one as a late-night treat, they’re bound to impress. So roll up your sleeves, gather your ingredients, and start making memories with this simple yet delicious delight.
Happy baking (or no baking, in this case)!
You’ll also like the following recipes!
- Classic French Onion Soup Copycat Recipe
- Best And Easy French Toast Recipe
- How to Make Mexican Street Corn Salad Esquites

Mini No Bake Cheesecake Recipe – Easy Family Meal
Description
Let me take you on a little journey. It’s a summer afternoon, the sun is warm, and the backyard is alive with laughter and conversation. You want to impress your friends but don't want to spend the entire day baking.
Enter the mini no bake cheesecake. This delightful treat is quick to whip up and offers a balance of fluffy creaminess and crunchy crust. You’ll find that, with just a bit of prep, you can create more than a dessert; you’ll craft a moment of joy.
So, let’s dive in—you're going to love this!
Ingredients
Filling
Graham Cracker Crust
Instructions
Step 1: Prepare the Crust
-
Start by mixing the crushed graham cracker crumbs and brown sugar in a medium bowl. Stir in the melted butter until everything is combined.
The mixture should resemble wet sand. Take a mini cheesecake pan or individual serving cups, and press the crumb mixture firmly into the bottom. You want a solid base, so don’t be shy with the pressure.
Step 2: Chill the Crust
-
Place the crust in the fridge for about 10-15 minutes. This step is crucial. Chilling helps the crust firm up, making it easier to fill without crumbling. While it’s chilling, let’s move on to the filling.
Step 3: Make the Filling
-
In a large mixing bowl, beat the cream cheese until it’s smooth and creamy. You can use a hand mixer or stand mixer for this part.
Gradually add the granulated sugar, sour cream (or yogurt), lemon juice, and vanilla extract. Mix until everything is combined and smooth. If you’re adding cinnamon, include it here.
Step 4: Whip the Cream
-
In a separate bowl, whip the chilled heavy cream until soft peaks form. This step is vital. The whipped cream will give your cheesecake its airiness.
Gently fold the whipped cream into the cream cheese mixture. Be careful here; you don’t want to deflate the whipped cream.
Step 5: Fill the Crusts
-
Once your crusts are chilled, spoon the cheesecake mixture into each cup or mold. Fill them to the top and smooth the surface with a spatula. Now, it’s time for the hardest part: the waiting.
Step 6: Chill Again
-
Let the filled cheesecakes chill in the refrigerator for at least 4 hours, ideally overnight. This helps all the flavors meld together and allows the cheesecake to set properly.
Step 7: Top and Serve
-
Before serving, add your favorite toppings. Fresh berries or a drizzle of fruit preserves are excellent choices. Get creative here! Serve these mini cheesecakes for a truly delightful dessert experience.
Nutrition Facts
Servings 24
- Amount Per Serving
- Calories 135kcal
- % Daily Value *
- Total Fat 9.5g15%
- Saturated Fat 5g25%
- Cholesterol 22mg8%
- Sodium 114mg5%
- Total Carbohydrate 10g4%
- Sugars 6g
- Protein 2g4%
* Percent Daily Values are based on a 2,000 calorie diet. Your daily value may be higher or lower depending on your calorie needs.
Note
- Use Full-Fat Cream Cheese: For the best flavor and texture, opt for full-fat cream cheese. The richness makes a significant difference.
- Chill Your Bowls: If you chill your mixing bowls and beaters before whipping the cream, it will whip up faster and get fluffier.
- Don’t Overmix: When combining the whipped cream with the cream cheese base, fold gently. Overmixing can cause the filling to lose its airy texture.
- Experiment with Flavors: Don’t be afraid to switch up the flavors. Add a splash of almond extract or some cocoa powder for a chocolate version.
- Go No Sugar: For a healthier option, you can use a sugar substitute to lighten up the dessert while maintaining sweetness.