When it comes to pairing smashed cheeseburgers, the goal is to balance out the juicy, savory goodness with sides that complement or contrast with the richness of the burger. A classic choice is crispy French fries; their crunch and saltiness perfectly balance the tender, juicy patty.
If you’re in the mood for something a bit different, thick-cut onion rings bring that extra crunch and a slightly sweet flavor that contrasts wonderfully with the burger’s savory richness. For a refreshing touch, tangy coleslaw is an ideal pairing. Its crispness and acidity help cut through the burger’s richness, offering a light, zesty contrast.
Another perfect side for a relaxed, sunny day is creamy potato salad. This comforting dish brings richness and smooth texture, making it a great complement to a hearty cheeseburger. If you want to add a bit of smoky flavor to your meal, grilled vegetables like zucchini and bell peppers are an excellent choice.
Their slight char and smokiness pair beautifully with the savory cheeseburger, adding depth and freshness to the meal. With these sides, your smashed cheeseburger experience becomes even more satisfying and complete.

What is a Smashed Cheeseburger?
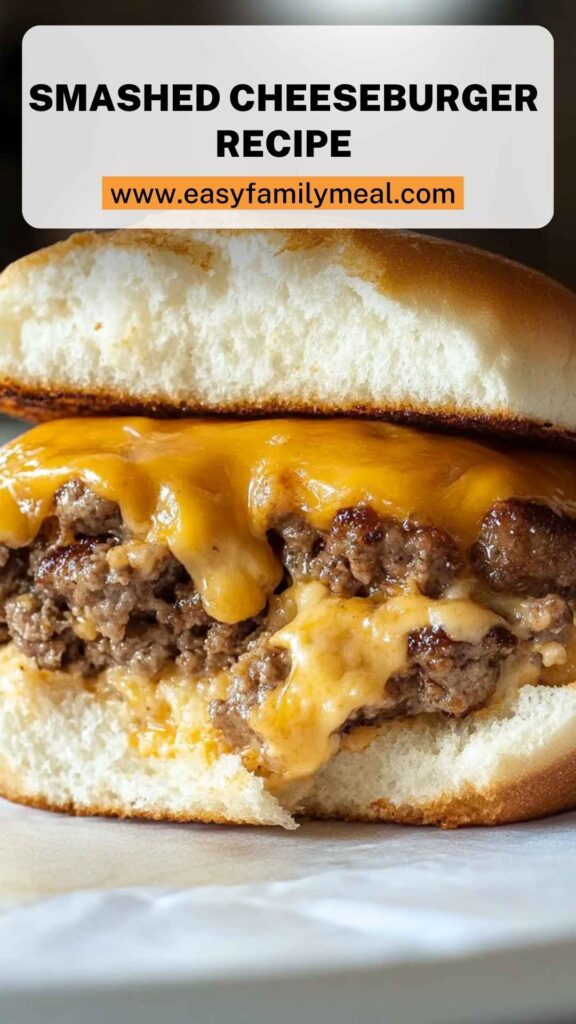
A smashed cheeseburger is essentially a simple beef patty pressed flat on a hot grill or skillet. Why smash? It maximizes the beef’s surface area that gets exposure to heat, resulting in a wonderful crust. The flavors concentrate beautifully.
Add it all together with high-quality cheese, and you’ve got yourself a delicious combination.
Traditionally, cheeseburgers involve thick patties, but smashing the meat creates a juicy inside with a crispy exterior. This pop of texture is what makes it special. You can play around with different cheeses, toppings, and condiments to make it fit your style.
Why You’ll Love this Smashed Cheeseburger
What’s not to love? A smashed cheeseburger lands perfectly on that fine line between gourmet and casual. When I first made one, I was amazed at the simplicity yet the depth of flavor.
- Quick and Easy to Make: You don’t need to be a cooking wizard here. It takes just minutes to prep and another few minutes to cook. This makes it perfect for a busy weeknight or a last-minute gathering.
- Customizable: Choose your meat type, cheese, and toppings. Want it spicy? Add jalapeños or spicy mayo. Prefer it simple? Just cheese and ketchup will do.
- Perfect for Gatherings: Whether you’re hosting friends or just having a family night, smashed cheeseburgers are crowd-pleasers. Each person can customize their burger to suit their tastes.
- Epic Flavor: The caramelization during smashing locks in the flavors. Combine that with melty cheese, and you have a burger that excites the taste buds.
- Affordable Ingredients: We’re not breaking the bank here. The main ingredients are easily accessible and budget-friendly.
The Ingredients You Will Need to Make Smashed Cheeseburger
To create a stunning smashed cheeseburger, you will need:
- 4 ounces of freshly ground beef chuck, divided into 2 equal portions
- Kosher salt and freshly cracked black pepper to taste
- 1 slice of high-quality melting cheese, like American, cheddar, or a creamy homemade melting cheese
- 1 soft hamburger bun, lightly buttered and grilled
- Choice of condiments and toppings, such as creamy mayonnaise, tangy mustard, fresh shredded lettuce, thinly sliced onions, juicy tomatoes, and crunchy pickles
- 1 tablespoon of barbecue sauce
- A few fresh basil leaves

Directions to Make Smashed Cheeseburger
Step 1: Prepare Your Ingredients
Gather all your ingredients on the counter. Form the ground beef into two balls, weighing about 4 ounces each. Pat them lightly into rough patties without overworking them.
Step 2: Heat the Grill or Skillet
Put your grill or a cast-iron skillet on medium-high heat. If you’re using a skillet, you might want a little oil to prevent sticking.
Step 3: Season the Beef
Sprinkle both sides of your burger patties with kosher salt and fresh black pepper. Not too much, just enough to enhance the natural flavors.
Step 4: Sear and Smash
Once your grill or skillet is hot, place a patty down. Using a spatula, smash it down firmly to flatten it. You’re looking for a nice crust, so apply consistent pressure for about 10 seconds. Repeat with the other patty.
Step 5: Cook Until Seared
Let the burgers cook for about three minutes before checking to flip, allowing those delicious crusty bits to form. When the edges begin to release from the grill, it’s time to flip.
Step 6: Add Cheese
Flip your patties carefully. Top each with a slice of cheese. Cover with a lid or another pan to create steam to melt the cheese. Cook for an additional one to two minutes.
Step 7: Toast the Buns
In the last minute, add your soft hamburger buns to the grill or skillet to lightly toast. Butter them first for extra flavor if you’d like.
Step 8: Assemble the Burger
Once everything is cooked to perfection, it’s time to assemble. Spread your favorite condiments on the bun, layer in the juicy burger, and add your toppings.
Step 9: Serve and Enjoy
Serve your smashed cheeseburgers immediately while they’re hot and cheesy. Pair with fries or your favorite side.
Notes
Here are five tips that might help refine your cooking experience:
- Don’t Overwork the Meat: When forming your patties, handle the meat gently. This keeps the texture tender.
- Avoid Overcrowding: If you’re cooking multiple burgers, make sure to give them enough space. Cook in batches if necessary.
- Experiment with Flavors: Try different cheeses and toppings. Blue cheese or pepper jack can add a new dimension.
- Watch the Heat: Too high of a heat, and you risk burnt burgers. Medium to medium-high is ideal for a great crust without burning.
- Let Them Rest: Allow cooked patties to rest for a minute before assembling. This keeps the juices intact.
Storage Tips
If you have any leftovers, here’s how to store them properly:
- In the Refrigerator: Let the burgers cool completely, then wrap them in foil or store in airtight containers. They can stay fresh for up to three days.
- In the Freezer: If you plan ahead, you can freeze the patties. Wrap them tightly in plastic wrap and aluminum foil. They’ll last up to three months.
To reheat, simply warm in a skillet until heated through or microwave them. If using a microwave, place a cup of water in the microwave along with the burger to prevent it from getting dry.
Serving Suggestions
Here are five ways to make this smashed cheeseburger even more enticing:
- Add a Fried Egg: A sunny-side-up egg on top can elevate your burger. The yolk creates a creamy texture that takes it to a new level.
- Consider Sweet Pickles: Try candied jalapeños or sweet pickles for a unique take. They add a delightful contrast to the savory beef.
- Try Homemade Sauce: Mix mayo with sriracha for a quick spicy sauce. A little goes a long way!
- Swap the Cheese: Gouda or brie makes for a rich and decadent twist on a classic.
- Explore Different Buns: Sourdough or brioche add different textures and flavors to your burger. Get creative!
What Other Substitutes Can I Use in Smashed Cheeseburger?
If you’re looking for alternatives, consider these substitutes:
- Ground Turkey: Leaner than beef, it’s a healthy option but can be drier. Add in a little olive oil for moisture.
- Plant-Based Meat: There are some fantastic plant-based options that mimic the taste and texture of beef.
- Ground Lamb: This is for the adventurous eater! It offers a unique flavor profile that you might find delightful.
- Fish Patties: For a light twist, substitute with a salmon patty. It pairs well with creamy sauces.
- Veggie Patties: Use buns to layer grilled portobello mushrooms, eggplant, or chickpea patties for a vegetarian option.

Conclusion
There’s something profoundly satisfying about making and biting into a smashed cheeseburger. It’s a simple pleasure that reminds us to cherish the small moments. With a little practice and creativity, you mold a meal that’s not just filling but exciting too.
So, whether you enjoy it with classic toppings or take a creative leap, the smashed cheeseburger is a recipe worth keeping in your culinary repertoire. It’s a versatile dish that suits everyone.
So fire up the grill…and let the burger party begin!
You’ll also like the following recipes!
- Popular Pasta With Vodka Sauce Copycat Recipe
- How To Boil Corn At Home In Cooker
- Best Mexican Street Corn Elotes Recipe

Smashed Cheeseburger Recipe – Easy Family Meal
Description
There’s a unique joy in sinking your teeth into a freshly smashed cheeseburger. The thrill of grilling, the aroma wafting through the air, and that first bite is like no other. As a food enthusiast and registered dietitian, I’m all about balancing taste and nutrition.
With every bite of this masterpiece, you get that burst of flavor, the satisfying crunch, and the melty goodness of cheese. After years of writing recipes, I can tell you that a smashed cheeseburger is the epitome of a quick, hearty meal.
Getting the perfect burger doesn’t require a culinary degree. Trust me; I’ve experimented, failed, and eventually nailed it. Smashed cheeseburgers are uncomplicated. With a handful of ingredients, you can whip up something incredible. Let's explore together!
Ingredients
Instructions
Step 1: Prepare Your Ingredients
-
Gather all your ingredients on the counter. Form the ground beef into two balls, weighing about 4 ounces each. Pat them lightly into rough patties without overworking them.
Step 2: Heat the Grill or Skillet
-
Put your grill or a cast-iron skillet on medium-high heat. If you’re using a skillet, you might want a little oil to prevent sticking.
Step 3: Season the Beef
-
Sprinkle both sides of your burger patties with kosher salt and fresh black pepper. Not too much, just enough to enhance the natural flavors.
Step 4: Sear and Smash
-
Once your grill or skillet is hot, place a patty down. Using a spatula, smash it down firmly to flatten it. You're looking for a nice crust, so apply consistent pressure for about 10 seconds. Repeat with the other patty.
Step 5: Cook Until Seared
-
Let the burgers cook for about three minutes before checking to flip, allowing those delicious crusty bits to form. When the edges begin to release from the grill, it’s time to flip.
Step 6: Add Cheese
-
Flip your patties carefully. Top each with a slice of cheese. Cover with a lid or another pan to create steam to melt the cheese. Cook for an additional one to two minutes.
Step 7: Toast the Buns
-
In the last minute, add your soft hamburger buns to the grill or skillet to lightly toast. Butter them first for extra flavor if you'd like.
Step 8: Assemble the Burger
-
Once everything is cooked to perfection, it's time to assemble. Spread your favorite condiments on the bun, layer in the juicy burger, and add your toppings.
Step 9: Serve and Enjoy
-
Serve your smashed cheeseburgers immediately while they're hot and cheesy. Pair with fries or your favorite side.
Nutrition Facts
Servings 1
- Amount Per Serving
- Calories 775kcal
- % Daily Value *
- Total Fat 40.3g62%
- Saturated Fat 14.6g73%
- Trans Fat 0.6g
- Cholesterol 251mg84%
- Sodium 737mg31%
- Total Carbohydrate 26g9%
- Dietary Fiber 2g8%
- Sugars 6g
- Protein 75g150%
* Percent Daily Values are based on a 2,000 calorie diet. Your daily value may be higher or lower depending on your calorie needs.
Note
- Don’t Overwork the Meat: When forming your patties, handle the meat gently. This keeps the texture tender.
- Avoid Overcrowding: If you're cooking multiple burgers, make sure to give them enough space. Cook in batches if necessary.
- Experiment with Flavors: Try different cheeses and toppings. Blue cheese or pepper jack can add a new dimension.
- Watch the Heat: Too high of a heat, and you risk burnt burgers. Medium to medium-high is ideal for a great crust without burning.
- Let Them Rest: Allow cooked patties to rest for a minute before assembling. This keeps the juices intact.