This post contains affiliate links. As an Amazon Associate I earn from qualifying purchases.
Homemade refrigerator pickles are my secret weapon for turning ordinary meals into something special. These tangy, crisp bites pair beautifully with hearty proteins like Barbacoa Recipe Instant Pot or classic Bacon Smokies Recipe. They add brightness, crunch, and that homemade touch that makes weeknight dinners feel intentional—without any complicated canning equipment.
How I Discovered the Joy of Quick-Pickled Vegetables
I remember the exact moment this recipe changed my weeknight dinner game. It was a Tuesday evening, and my kids were asking for “something crunchy” alongside their pulled pork. I had cucumbers sitting on the counter, a pantry full of vinegar and spices, and exactly thirty minutes before dinner needed to be on the table.
I threw everything together in a jar, stuck it in the fridge, and by the time we sat down to eat an hour later, we had the crispest, most flavorful pickles I’d ever made. My seven-year-old ate three spears before touching anything else on her plate. That’s when I realized: this wasn’t just a side dish—it was a game-changer for families who want real food without the stress.
For the last ten years, I’ve been helping busy families like yours create nourishing meals without the overwhelm. Refrigerator pickles represent everything I believe in: simple ingredients, minimal effort, and maximum flavor that makes everyone at the table happy.
What is Refrigerator Pickles Recipe?
Refrigerator pickles—sometimes called “quick pickles” or “fresh pickles”—are vegetables preserved in a simple vinegar brine without any canning or heat processing. Unlike traditional fermented pickles that sit for weeks, these beauties are ready to eat in just one to two hours, though they taste even better after sitting overnight.
This method comes from a long tradition of preservation, but it’s been simplified for modern kitchens. There’s no special equipment needed, no pressure cooker, no sterilization process. You simply layer cucumbers with aromatics in a jar, pour hot brine over everything, and let the refrigerator do the work.
What makes refrigerator pickles special is their texture and flavor profile. They stay crisp and snappy—nothing mushy or overly soft like some store-bought varieties. The fresh dill and garlic infuse directly into the brine, creating layers of flavor that develop beautifully as they sit.
Why You’ll Love This Refrigerator Pickles Recipe
- Ready in minutes, not weeks – Unlike traditional pickling, you’ll have tangy, crunchy pickles ready to eat in under two hours. Perfect for last-minute meal prep or unexpected dinner guests.
- No special equipment required – Forget about canning jars, pressure cookers, and sterilization. A simple mason jar and your refrigerator are all you need to succeed.
- Total flavor control – You decide exactly how much salt, spice, and tang goes into each batch. No mystery ingredients or preservatives hiding in the label.
- Kids actually eat vegetables – My experience shows that when kids help make pickles and taste them fresh, they’re way more likely to eat them. The process is fun, and the results are undeniably delicious.
- Extends cucumber season – Have a surplus of garden cucumbers or farmers market finds? This recipe prevents waste and transforms them into something your family will actually crave.
- Budget-friendly meal addition – At roughly $0.50 per jar, homemade pickles are significantly cheaper than jarred versions while tasting infinitely fresher.
- Adaptable to any palate – Whether your family loves mild flavors or serious heat, you can adjust spices to match everyone’s preferences in a single batch.
The Ingredients
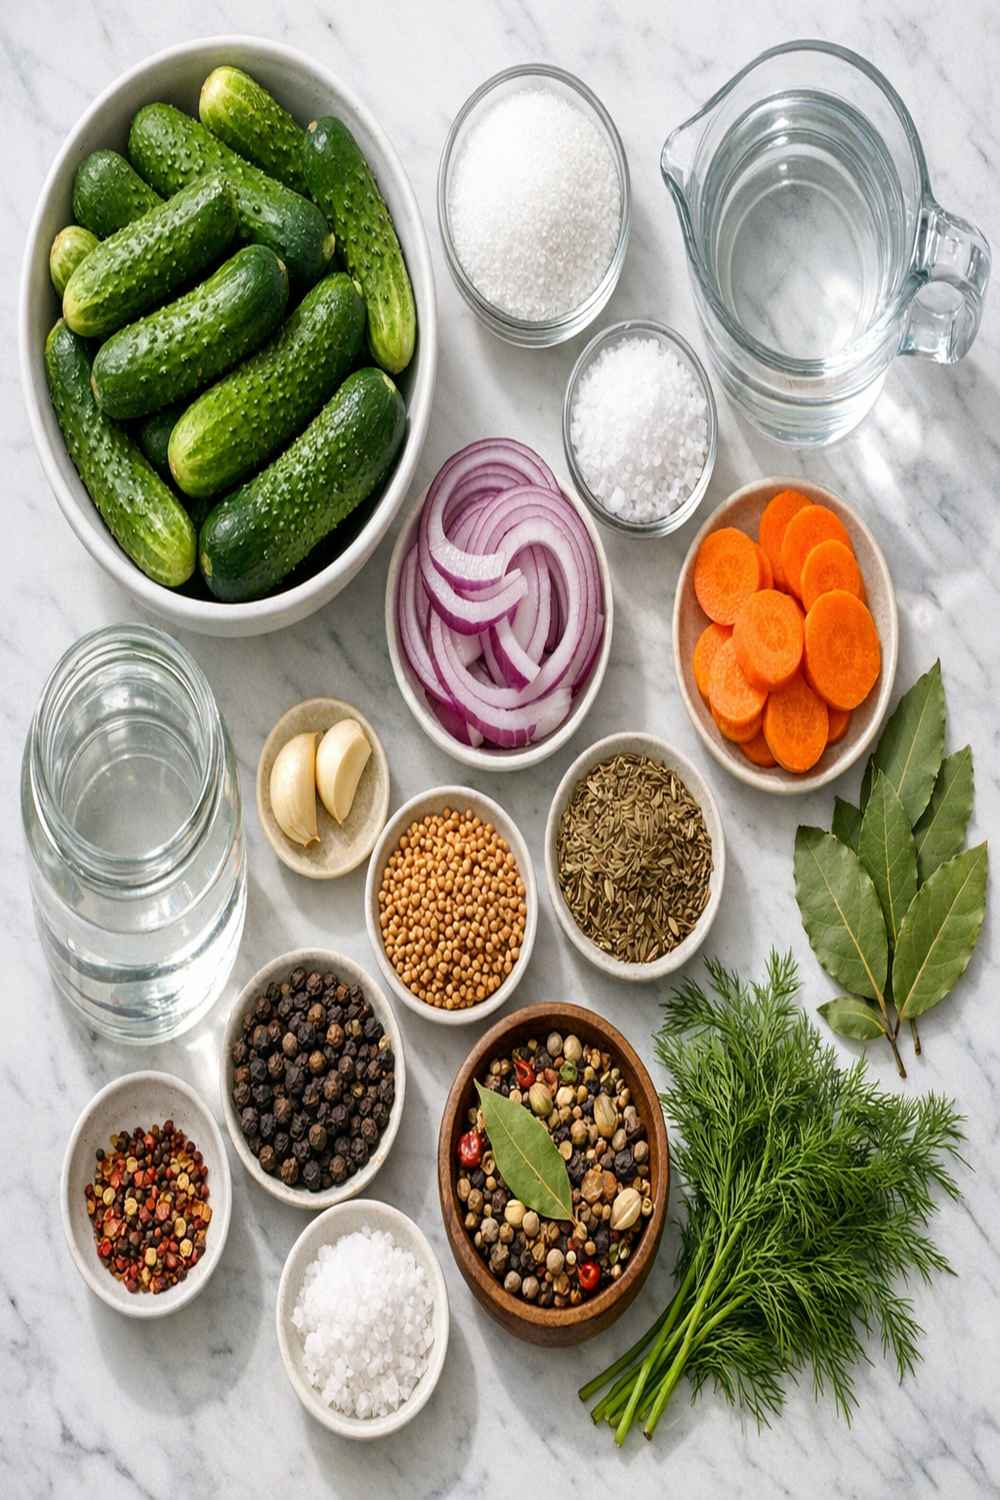
I’ve intentionally kept this ingredient list simple and flexible. Every item serves a purpose, and most are probably sitting in your pantry right now. The beauty of refrigerator pickles is that you can adjust ratios based on what you have on hand—within reason. Here’s what you’ll need to create one quart of delicious homemade pickles:
- 1 small bay leaf (optional but recommended for depth)
- ½ teaspoon yellow mustard seeds (enhances flavor complexity)
- pinch of celery seed (adds subtle earthiness that rounds out the profile)
- ¼ teaspoon red pepper flakes (adjust based on your family’s spice tolerance)
- 10 whole black peppercorns (adds subtle heat without overwhelming)
- ½ to 1 teaspoon granulated sugar (balances the acidity beautifully)
- fresh dill (about 2 to 3 sprigs, or 1 teaspoon dried if fresh isn’t available)
- 2 cups filtered or distilled water (tap water works, but filtered prevents cloudiness)
- 6 to 7 pickling cucumbers (approximately 1.5 pounds, smaller varieties work best for crispness)
- 1 tablespoon kosher salt (never use iodized, which makes brine cloudy)
- 4 to 6 garlic cloves (peeled and smashed slightly to release their aromatics)
- 1 cup white vinegar (or apple cider vinegar for a slightly softer tang)
How to Make Refrigerator Pickles
This process is genuinely straightforward—I promise. Even if you’ve never pickled anything before, you’ll feel like a pro by the end. Let’s walk through it step by step, and I’ll share exactly what you’re looking for at each stage.
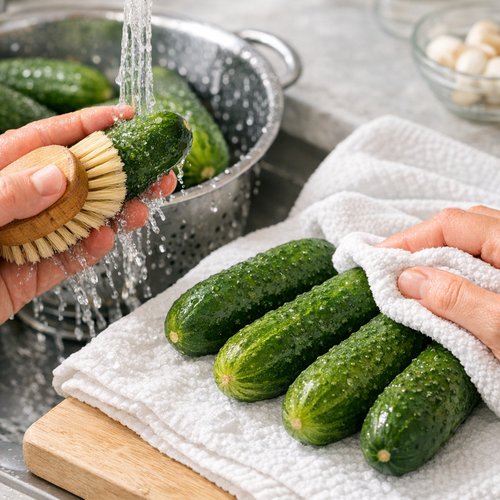
Step 1: Prepare Your Cucumbers Properly
Start by rinsing your cucumbers under cool water and scrubbing them gently with a clean brush to remove any dirt. Pat them completely dry with a clean kitchen towel—this is important because excess moisture dilutes your brine.
Now trim off both the blossom end (the dimpled side opposite the stem) and the stem end completely. The blossom end contains enzymes that can cause softening, so removing it is key to maintaining that perfect crunch. Slice your cucumbers into spears or rounds, depending on your preference. Spears are great for snacking straight from the jar, while rounds work better for sandwiches and burgers.
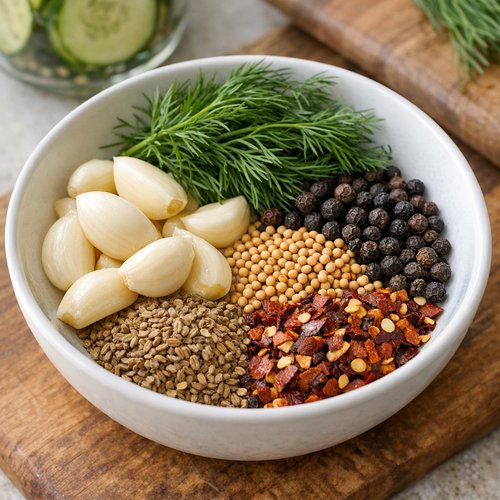
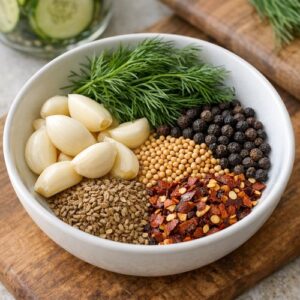
Step 2: Gather Your Aromatics in One Bowl
While your cucumbers are prepping, combine your garlic cloves, fresh dill, black peppercorns, mustard seeds, red pepper flakes, and celery seed in a small bowl. You don’t need to mix them—just have them ready and visible. This takes thirty seconds but saves you from scrambling to find spices once the hot brine is ready.
Lightly smash your garlic cloves with the side of a knife to break them open slightly. This releases their oils and allows them to flavor the brine more effectively. You want them broken, not minced.
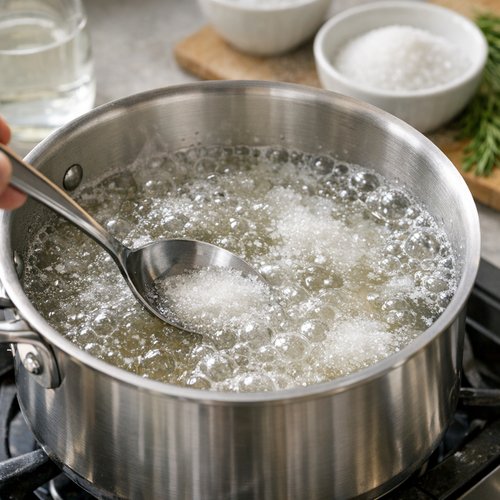
Step 3: Combine Water, Vinegar, Salt, and Sugar
Pour your water and vinegar into a medium saucepan. Add the kosher salt and granulated sugar. Bring the mixture to a boil over medium-high heat, stirring occasionally until the salt and sugar dissolve completely—this should take about 5 to 7 minutes.
You’ll notice the brine starts to steam noticeably once it reaches a rolling boil. Don’t skip the boiling step; the heat helps ensure proper flavor development and preservation. Once you see active bubbles breaking the surface consistently, you’re ready to move forward.
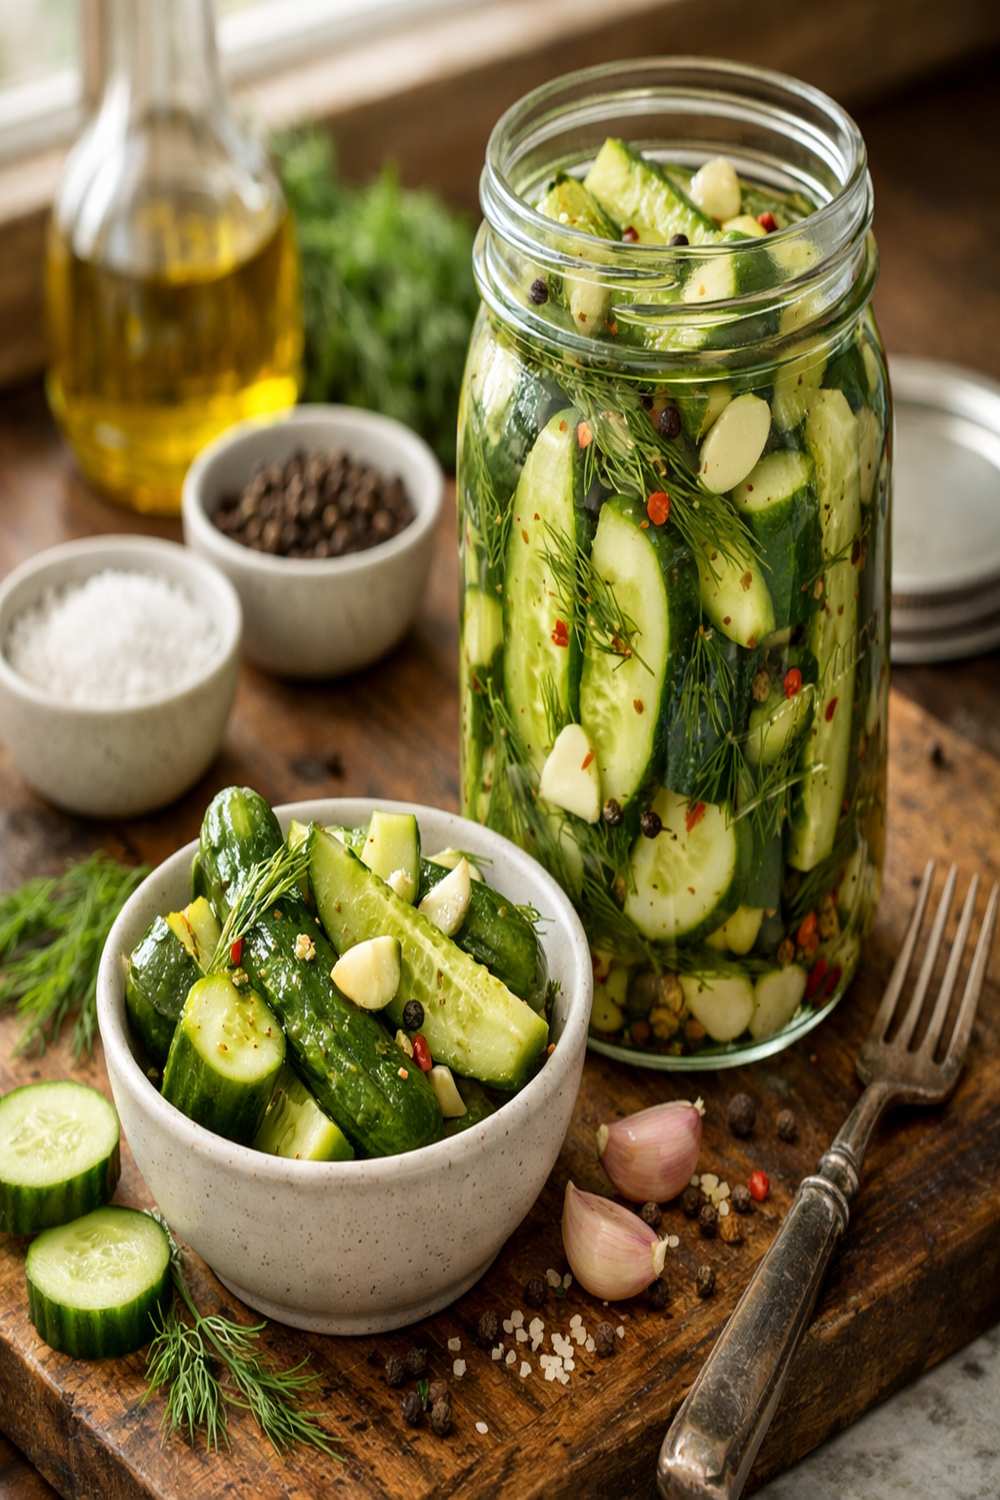
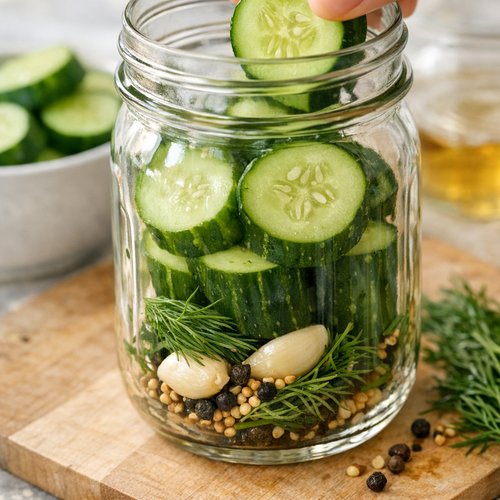
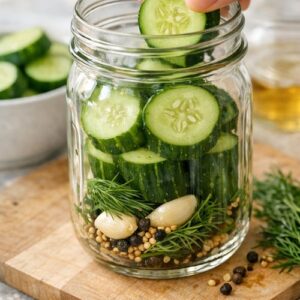
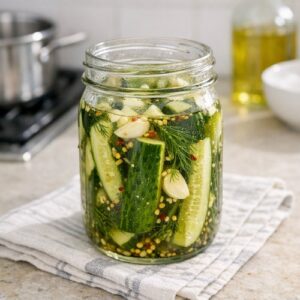
Step 4: Layer Cucumbers and Aromatics in Your Jar
While your brine comes to temperature, grab a clean quart-sized mason jar (or any glass jar with a tight lid). Start by adding about one-third of your aromatic mixture to the bottom—garlic, dill, peppercorns, and all those wonderful spices.
Layer roughly half of your cucumber spears or slices on top. Add another layer of aromatics (using about one-third of what remains), then finish with your remaining cucumbers. Top everything with the final layer of aromatics. This arrangement ensures flavors are distributed throughout the jar rather than concentrated at the bottom.
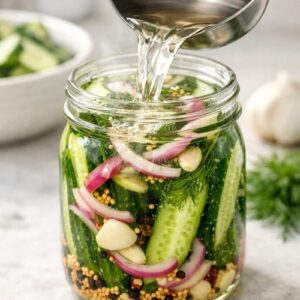
Step 5: Pour Hot Brine Over Everything
Carefully pour your hot vinegar brine over the cucumbers and aromatics, filling the jar until the liquid covers everything completely. You need at least ½ inch of brine above the topmost cucumber piece to ensure proper preservation and flavor.
Some liquid will overflow—that’s completely normal. Have a small towel nearby to catch drips. The hot brine will look cloudier than you might expect, but don’t worry; it clears up beautifully as it cools.

Step 6: Cool and Refrigerate Immediately
Place the uncovered jar on your counter and let it cool to room temperature—this takes roughly 30 to 45 minutes. Once it’s cool enough to touch comfortably, cover it with a tight-fitting lid and transfer it to your refrigerator.
At this point, you can taste a spear if you’re curious, but I recommend waiting at least one to two hours for the flavors to really meld. That said, they’re technically ready to eat immediately if hunger strikes!

Expert’s Nutritional Tip
As a registered dietitian who works with families every single day, I want you to know that pickles aren’t just tasty—they’re genuinely nutritious. Cucumbers are naturally low in calories (about 16 calories per 100 grams) while providing fiber, vitamin K, and potassium. The vinegar in the brine actually supports healthy digestion and may help stabilize blood sugar levels when eaten with meals.
Here’s what I tell parents: the pickles themselves are practically a free vegetable pass. Your kids are eating vegetables, getting fermented enzymes and beneficial compounds, and thinking they’re indulging in something special. That’s a nutritional win in my book. Add them to lunchboxes, chop them into tuna salad, or serve them as a crunchy side to Adult Grilled Cheese Recipe for a complete meal.
Tips and Tricks
- Choose the right cucumber variety – Pickling cucumbers (often labeled “Kirby” or “Boston”) stay crispier than slicing varieties. If you can only find regular cucumbers, select smaller, thinner ones and use them immediately.
- Don’t skip the blossom-end removal – This single step makes the difference between crispy pickles and soft ones. The enzymes at the blossom end break down cell walls, so removing it is non-negotiable for texture.
- Use kosher salt, always – Kosher salt dissolves cleanly without additives. Iodized table salt can cloud your brine and create an off-flavor. Sea salt works too, just measure by weight rather than volume.
- Pack your jar strategically – Don’t cram cucumbers in too tightly or they won’t pickle evenly. Arrange them vertically or diagonally with some space between pieces for brine circulation.
- Taste after 24 hours for optimal flavor – While they’re good after two hours, pickles taste noticeably better after spending a full night in the brine. The flavor deepens and becomes more integrated.
- Make the brine hot, but not boiling when you pour – If it’s still at a rolling boil, you risk cracking a glass jar. Let it sit for 2 to 3 minutes after it stops boiling, then pour carefully.
- Try different vinegar types – Apple cider vinegar creates a slightly softer, rounder tang. White vinegar is more assertive. Rice vinegar is milder. Experiment to find your family’s preference.
Make-Ahead Guide
One of my favorite things about refrigerator pickles is how beautifully they fit into real-life meal prep schedules. Here’s exactly how I recommend building them into your weekly routine:
Sunday Prep Strategy: Make a double batch on Sunday evening while you’re prepping other components for the week. One jar goes to the fridge for immediate use; the second becomes your backup for mid-week snacking or sandwich building.
Brine Preparation: You can actually make the brine up to three days in advance. Prepare your water-vinegar-salt-sugar mixture, cool it completely, and store it in an airtight container in the fridge. When you’re ready to pickle, simply reheat until steaming before pouring over fresh cucumbers. This method saves time on busy nights.
Pre-Cut Cucumbers: If you want to streamline even further, you can slice and prepare your cucumbers the morning of pickling and store them in a container with a damp paper towel. They’ll stay fresh for up to eight hours and be ready to jar immediately.
Multiple Jars Strategy: I often keep three jars rotating through my fridge during peak cucumber season. As one jar gets eaten, I start a new one. This ensures fresh pickles are always available without the pressure of constant batch-making.
Common Mistakes to Avoid
- Using wet cucumbers – I can’t emphasize this enough. Water dilutes your brine, weakens flavors, and creates an environment where pickles soften faster. Dry them completely after washing.
- Forgetting to remove the blossom end – This is the single most common reason homemade pickles turn mushy. Those enzymes work fast. Remove that dimpled end every single time.
- Packing the jar too tightly – Cucumbers need space for brine to circulate around them evenly. If they’re crammed together, you’ll have some that pickle perfectly and others that stay crispy on the outside but soft inside.
- Using the wrong salt – Iodized table salt will cloud your brine and create off-flavors. Kosher salt is the only choice here. It costs the same and makes a noticeable difference.
Seasonal Variations
Summer (Fresh Harvest): During peak cucumber season, add fresh tarragon, basil, or thyme instead of dill for a lighter, more herbaceous flavor. Include thin lemon slices for brightness.
Fall: Switch to apple cider vinegar and add a cinnamon stick, whole cloves, and star anise. This creates a spiced pickle that’s lovely with roasted meats and comfort foods.
Winter: When fresh herbs are limited, double down on dried dill and garlic. Add a pinch of turmeric for color and an earthy note that pairs beautifully with hearty winter soups.
Spring: Embrace fresh dill, chives, and tarragon from your garden. Make smaller, more frequent batches using the youngest, thinnest cucumbers available for maximum delicacy.
Can I Store Refrigerator Pickles?
Absolutely, and this is one of my favorite things about this recipe. Properly stored refrigerator pickles last surprisingly long. Keep your jar tightly covered in the coldest part of your refrigerator—ideally at 35 to 40 degrees Fahrenheit.
They’ll stay fresh and crispy for up to two to three weeks from the day you made them. The flavor actually continues to develop during this time, so don’t be surprised if they taste even better on week two than on day one.
After three weeks, the cucumbers may soften slightly and the flavor becomes more intense. They’re still safe to eat but lose some of that perfect crunch that makes them so special. Most of my batches get eaten well before they reach that point anyway!
If you notice any cloudiness, off-odors, or visible mold (extremely rare with this method), discard the batch immediately. That said, I’ve made hundreds of jars and have never experienced spoilage when stored properly.
Nutrition Information
Based on USDA guidelines, one serving of refrigerator pickles (approximately 5 ounces or one small handful of spears) contains roughly 16 calories, 0 grams of fat, 3 grams of carbohydrates, 1 gram of fiber, and less than 1 gram of protein. The sodium content varies based on your salt measurements but typically runs around 600 to 800 milligrams per serving.
What’s particularly valuable from a nutritional standpoint is that pickles are nutrient-dense without being calorie-dense. You’re getting vitamin K for bone health, potassium for heart function, and polyphenols from the vinegar that have antioxidant properties. They’re essentially free vegetables in terms of caloric cost.
The vinegar in the brine brings its own benefits. Research suggests acetic acid (the main component of vinegar) may improve insulin sensitivity and support healthy blood sugar management when consumed with meals. This is why I’m always happy when my kids eat pickles alongside their main course.
What Can I Serve With Refrigerator Pickles?
Refrigerator pickles are incredibly versatile and add brightness to countless meals. Here are my favorite ways to use them in everyday family cooking:
- With sandwiches and burgers – Layer spears on any sandwich for crunch and tang. They’re particularly stunning with BBQ Beef Recipe or Ham and Cheese Sandwich Recipe, where they cut through rich meats beautifully.
- As a taco topping – Chop them finely and sprinkle over tacos for brightness. They’re especially good with pulled pork and fish tacos.
- Alongside plated proteins – Serve 2 to 3 spears as a vegetable side with grilled chicken, roasted fish, or slow-cooker meals. They’re colorful and add nutritional balance without extra cooking.
- Chopped into grain bowls – Mix into rice bowls, quinoa bowls, or pasta salads for tangy crunch that keeps everything from feeling heavy.
- With charcuterie and cheese boards – Arrange whole spears on serving boards alongside meats, cheeses, and olives for sophisticated entertaining.
- Straight from the jar as a snack – My kids grab these as readily as they’d grab chips. It’s a parent win when the snack your child loves is actually vegetables.
- In lunchboxes – A small container of spears keeps lunch interesting and adds vegetables without requiring reheating.
Substitutes
- Alternative vegetables – While this recipe is designed for cucumbers, the same brine works beautifully with green beans, asparagus, carrots, bell peppers, or cauliflower. Adjust cooking time based on firmness—softer vegetables need less time in hot brine.
- Vinegar options – Use white wine vinegar, rice vinegar, or even champagne vinegar instead of white or apple cider. Each creates a different flavor profile. Avoid distilled vinegar, which is too aggressive.
- Fresh herb substitutes – If you don’t have fresh dill, use tarragon, basil, oregano, or thyme. Dried dill works fine too—use about ½ teaspoon.
- Garlic alternatives – If your family dislikes garlic, simply omit it. To maintain flavor complexity, add extra mustard seeds or a small piece of fresh ginger instead.
- Heat level adjustments – Don’t like spicy? Remove the red pepper flakes entirely. Want serious heat? Double or triple them, or add fresh hot peppers to the jar.
Refrigerator Pickles Recipe
Ingredients
Method
- Start by rinsing your cucumbers under cool water and scrubbing them gently with a clean brush to remove any dirt. Pat them completely dry with a clean kitchen towel—this is important because excess moisture dilutes your brine. Now trim off both the blossom end (the dimpled side opposite the stem) and the stem end completely. The blossom end contains enzymes that can cause softening, so removing it is key to maintaining that perfect crunch. Slice your cucumbers into spears or rounds, depending on your preference. Spears are great for snacking straight from the jar, while rounds work better for sandwiches and burgers.

- While your cucumbers are prepping, combine your garlic cloves, fresh dill, black peppercorns, mustard seeds, red pepper flakes, and celery seed in a small bowl. You don't need to mix them—just have them ready and visible. This takes thirty seconds but saves you from scrambling to find spices once the hot brine is ready. Lightly smash your garlic cloves with the side of a knife to break them open slightly. This releases their oils and allows them to flavor the brine more effectively. You want them broken, not minced.
- Pour your water and vinegar into a medium saucepan. Add the kosher salt and granulated sugar. Bring the mixture to a boil over medium-high heat, stirring occasionally until the salt and sugar dissolve completely—this should take about 5 to 7 minutes. You'll notice the brine starts to steam noticeably once it reaches a rolling boil. Don't skip the boiling step; the heat helps ensure proper flavor development and preservation. Once you see active bubbles breaking the surface consistently, you're ready to move forward.

- While your brine comes to temperature, grab a clean quart-sized mason jar (or any glass jar with a tight lid). Start by adding about one-third of your aromatic mixture to the bottom—garlic, dill, peppercorns, and all those wonderful spices. Layer roughly half of your cucumber spears or slices on top. Add another layer of aromatics (using about one-third of what remains), then finish with your remaining cucumbers. Top everything with the final layer of aromatics. This arrangement ensures flavors are distributed throughout the jar rather than concentrated at the bottom.
- Carefully pour your hot vinegar brine over the cucumbers and aromatics, filling the jar until the liquid covers everything completely. You need at least ½ inch of brine above the topmost cucumber piece to ensure proper preservation and flavor. Some liquid will overflow—that's completely normal. Have a small towel nearby to catch drips. The hot brine will look cloudier than you might expect, but don't worry; it clears up beautifully as it cools.
- Place the uncovered jar on your counter and let it cool to room temperature—this takes roughly 30 to 45 minutes. Once it's cool enough to touch comfortably, cover it with a tight-fitting lid and transfer it to your refrigerator. At this point, you can taste a spear if you're curious, but I recommend waiting at least one to two hours for the flavors to really meld. That said, they're technically ready to eat immediately if hunger strikes!
Notes
FAQs
Can I use regular slicing cucumbers instead of pickling cucumbers?
You can, but the results won’t be quite as good. Slicing cucumbers have more seeds and higher water content, which makes them softer. If that’s all you have available, select the smallest, firmest ones you can find and plan to eat them within a few days. You’ll notice a textural difference compared to traditional pickling varieties.
Do refrigerator pickles need to be heated or processed in a water bath?
Not at all. This is what makes them so convenient. Because they’re stored in the refrigerator at cold temperatures, they don’t require canning or any heat processing beyond making the initial brine. The combination of vinegar acidity and refrigeration keeps them safe and fresh.
Can I reuse the brine from one batch to make another?
I don’t recommend it, especially after two weeks. As cucumbers sit, they release water and soften the brine slightly. The flavor also becomes very intense. It’s better to make fresh brine each time. It takes only five minutes and ensures optimal texture and flavor.
Why did my pickles turn soft or mushy?
This usually comes down to one of three things: you didn’t remove the blossom end, your jar wasn’t sealed properly allowing them to oxidize, or they’ve been sitting longer than three weeks. The blossom-end removal is the most common culprit. Those enzymes work quickly, so don’t skip this step.
Can I adjust the amount of salt or sugar in the recipe?
Yes, within reason. I suggest using the full 1 tablespoon of salt for proper preservation and flavor. You can reduce salt to ¾ tablespoon if you’re watching sodium intake, but not lower. For sugar, you can adjust from ½ to 1 teaspoon based on your family’s preferences—less for a more assertive tang, more for sweetness.
More Recipes You’ll Love
- this cozy soup – This hearty slow-cooker soup pairs beautifully with a side of crispy pickles for bright contrast.
- Barbecue Roast Beef Recipe – Tender, smoky roast beef gets a perfect foil from tangy homemade pickles.
- The In-N-Out Double-Double Animal Style Burger – These beloved burgers absolutely sing when topped with fresh pickles instead of standard dill slices.
There you have it—everything you need to make refrigerator pickles that will have your whole family asking when you’re making the next batch. I promise this recipe will become part of your regular rotation once you see how easy it is and taste how good it is.
The best part? Knowing you’re providing your family with real vegetables, actual flavor, and a homemade touch that store-bought just can’t replicate. That’s what feeds bodies and builds family memories at the dinner table.
Happy Cooking!