This post contains affiliate links. As an Amazon Associate I earn from qualifying purchases.
Stromboli nights are my favorite family dinners. There’s something magical about a warm, cheesy spiral of deli meat goodness that makes even my pickiest eater excited about dinner. I pair this beauty with a crisp green salad and maybe some baked broccoli with cheese on the side, and suddenly a busy Tuesday feels like a celebration. It’s the kind of meal that brings everyone to the table without fuss—and that’s exactly what I’m here to help you master.
How I Fell in Love With Stromboli (And Why Your Family Will Too)
I remember the first time I made stromboli from scratch. My oldest was seven, my youngest was three, and I had exactly 90 minutes before soccer practice. I’d always bought frozen versions before, but something shifted when I realized how simple homemade truly is.
I mixed the dough while the kids colored at the kitchen table. As it rose, they watched through the oven window like it was the most exciting thing they’d ever seen. When I rolled it out, filled it with their favorite meats and cheese, and twisted it into that spiral shape—they were absolutely mesmerized. Twenty minutes later, golden and steaming, it came out of the oven.
That meal taught me something profound: the simplest recipes often create the biggest memories. Now, ten years and hundreds of stromboli later, I’m passing this wisdom to you.

What is Stromboli?
Stromboli is an Italian-American rolled bread filled with cured meats, cheese, and sometimes vegetables. Think of it as a pizza rolled up tight and baked until the outside is golden and crispy while the inside stays tender and loaded with flavor.
Unlike calzone (which is folded), stromboli is tightly rolled lengthwise, creating those beautiful spiral layers when you slice it. The name likely comes from Stromboli, an island off Italy’s coast, though Italian immigrants created this version here in the States—probably as a way to use leftover meats and bread dough.
What makes stromboli so special is its versatility. You control every ingredient. No mystery fillings, no unexpected surprises. Just quality dough, great meats, melted cheese, and about 25 minutes in the oven. It’s comfort food that’s easier than people think.
Why You’ll Love This Stromboli Recipe
- Kid-approved and customizable – Everyone in your family can have their own filling preferences. My youngest loves just cheese and pepperoni, while my oldest wants everything. No cooking two separate meals.
- Faster than ordering out – From start to finish, this takes about an hour. By the time you’d wait for delivery, you’re already eating a fresh, warm stromboli made in your own kitchen.
- Perfect for meal prep – Make two, freeze one. Bake from frozen with just 5 extra minutes. I do this every other Sunday and my family thanks me all week.
- Requires basic pantry staples – You likely have most ingredients already. No specialty items or hard-to-find components. Just real food you recognize.
- Budget-friendly for a crowd – One stromboli feeds four to six people for less than takeout pizza. It’s genuinely economical without sacrificing quality or taste.
- Impressive yet simple – Guests always assume stromboli is harder than it actually is. You get compliments while barely breaking a sweat in the kitchen.
The Ingredients
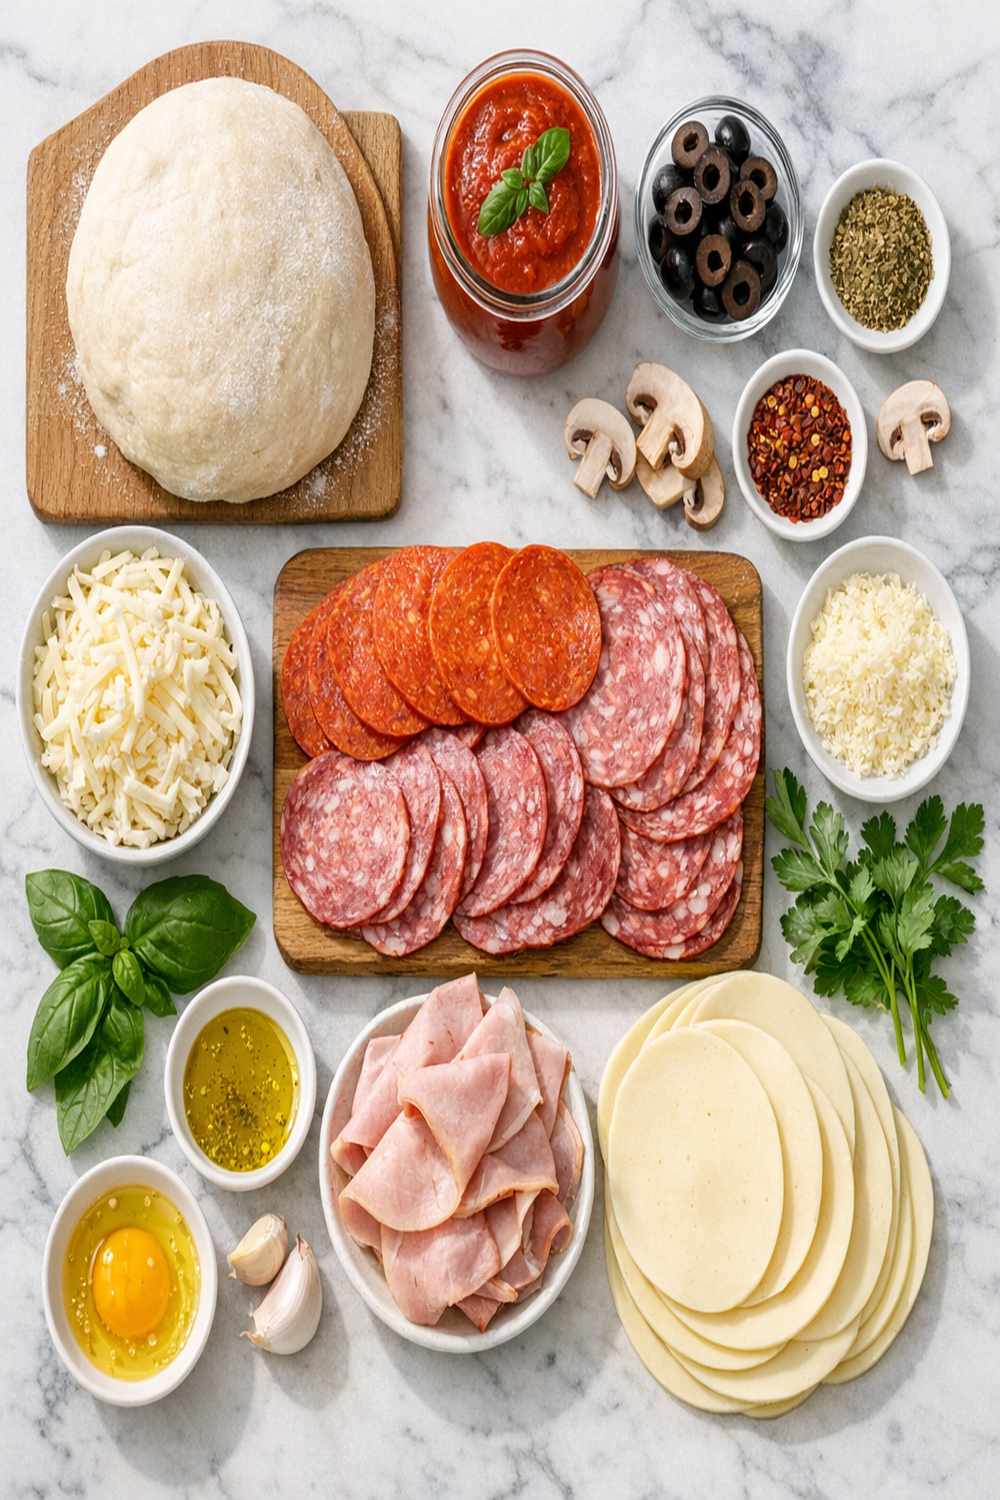
I’ve built this ingredient list around what works in real family kitchens. Everything here serves a purpose—nothing fancy, nothing unnecessary. This makes one beautiful stromboli that feeds four to six people comfortably.
For the Dough
- 1 tablespoon granulated sugar (helps activate the yeast)
- 2 tablespoons olive oil (extra virgin or regular, either works beautifully)
- 1 and 1/3 cups warm water (between 100-110°F, so it feels warm but not hot to your wrist)
- 3 and 1/2 cups all-purpose flour (spooned and leveled, never packed down)
- 1 teaspoon salt (use fine sea salt or table salt)
- 2 and 1/4 teaspoons instant or active-dry yeast (one standard packet)
For the Filling and Topping
- 2 garlic cloves (minced fresh, or 1/2 teaspoon garlic powder if you prefer)
- 1/2 teaspoon red pepper flakes (optional but adds a nice kick)
- 2 teaspoons fresh chopped parsley (or 1 teaspoon dried Italian parsley)
- Flaky sea salt and grated Parmesan for garnish (optional but highly recommended)
- 3/4 to 1 pound cheese, about 3 to 4 cups shredded (use mozzarella, provolone, or a blend—freshly shredded melts better than pre-packaged)
- 3 tablespoons unsalted butter (melted and slightly cooled)
- 1 pound thinly sliced Italian cold cuts (combination of Italian ham, capicola, and salami creates the best flavor)
- 1 large egg (beaten with 1 tablespoon water for egg wash, creates that gorgeous golden shine)
How to Make Stromboli?
I’ve broken this into clear steps that’ll guide you through every stage. Don’t rush—especially the kneading and rising. Those quiet moments in the kitchen are where the magic happens. I promise this is more straightforward than it sounds.
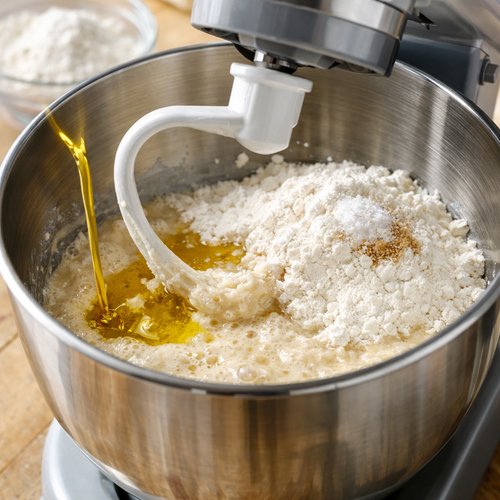
Step 1: Activate Your Yeast
In the bowl of your stand mixer (or a large mixing bowl if mixing by hand), whisk together your warm water, yeast, and sugar. Let this sit undisturbed for about 5 minutes. You’ll notice it become foamy and smell wonderfully yeasty—that’s exactly what you want. This step ensures your yeast is alive and ready to work.

Step 2: Build Your Dough
Add the olive oil, salt, and flour to your yeast mixture. If using a stand mixer, beat on low speed for about 2 minutes until everything comes together into a shaggy dough. If mixing by hand, stir vigorously with a wooden spoon or silicone spatula until combined. Don’t worry if it looks rough—that’s normal at this stage.
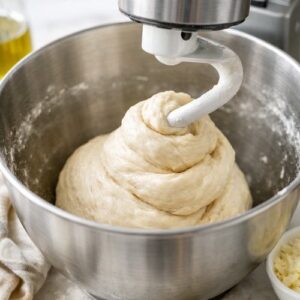
Step 3: Knead Until Perfect
Switch to the dough hook on your mixer (if using one) and beat for a full 5 minutes. If kneading by hand on a lightly floured surface, work the dough for 5 full minutes with consistent pressure. The dough will transform from sticky to smooth and elastic. If it becomes too sticky during kneading, sprinkle just 1 teaspoon of flour at a time—don’t overdo it. Your final dough should feel soft and slightly tacky, not dry.
To test if you’ve kneaded enough, poke your dough with your finger. It should slowly bounce back. For extra confidence, do the windowpane test: tear off a small piece and gently stretch it thin. Hold it to the light. Does light pass through without tearing? You’re done. If not, keep kneading for another minute or two.

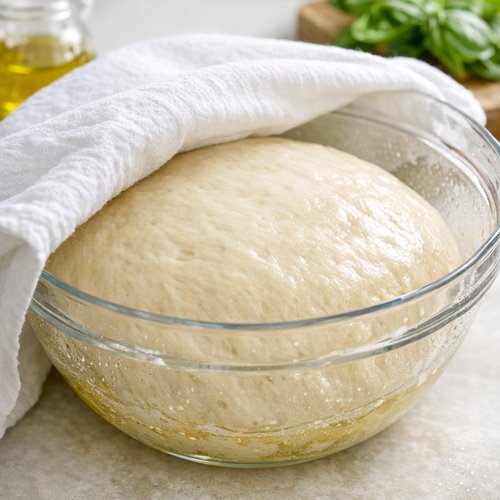
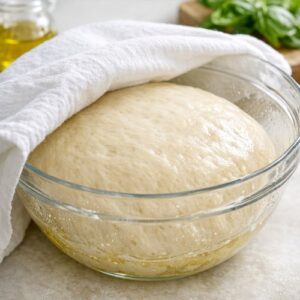
Step 4: First Rise
Place your dough in a lightly oiled bowl, turning it once to coat all sides. Cover with a clean kitchen towel or plastic wrap. Let it rise at room temperature for 1 to 1.5 hours until it’s roughly doubled in size. You’ll know it’s ready when you gently poke it and the indentation stays rather than bouncing back.
Step 5: Prepare Your Filling
While the dough rises, prepare everything for filling. Layer your sliced Italian meats on a plate. Shred your cheese if you haven’t already (freshly shredded really does melt better than pre-packaged). Mix together the melted butter, minced garlic, fresh parsley, and red pepper flakes in a small bowl. This garlicky butter will brush on top and create that irresistible crust.

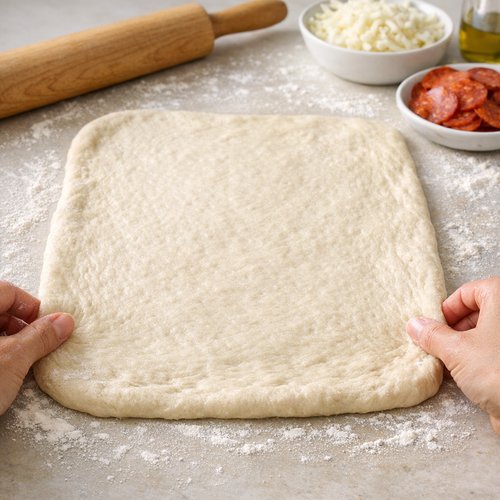
Step 6: Shape Your Stromboli
Turn your risen dough onto a lightly floured surface. Using your hands or a rolling pin, gently stretch and shape it into a rectangle approximately 14 by 10 inches. Don’t stress about perfect dimensions—close is plenty good enough. Leave about a 1-inch border on all sides bare (you’ll fold these edges later).
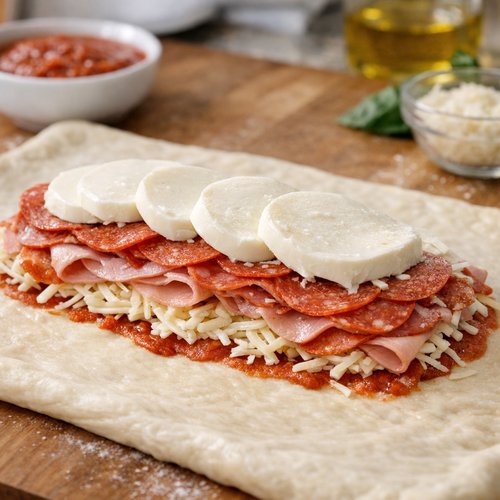
Step 7: Layer Your Fillings
Starting about an inch from one of the long edges, layer your fillings in this order: meats first, then cheese. Don’t overstuff—think generous but not excessive. Leave that 1-inch border on all sides so nothing leaks out during baking. The meats should cover most of the surface, followed by an even layer of cheese.
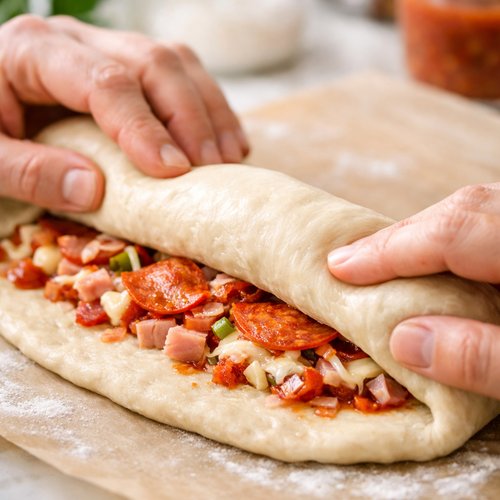
Step 8: Roll and Seal
Starting from the long edge closest to your fillings, roll the dough tightly toward the opposite edge, using gentle but firm pressure. You’re creating a log, not a burrito—consistent tension matters. Once fully rolled, pinch the seam and both short ends closed so nothing escapes during baking. Place seam-side down on a parchment-lined baking sheet.
Step 9: Apply Egg Wash and Garlic Butter
Beat together one large egg with 1 tablespoon water. Brush this mixture all over your stromboli. This creates that beautiful golden-brown exterior everyone loves. Now brush your prepared garlic butter mixture over the egg wash. Sprinkle generously with flaky sea salt, dried parsley, and Parmesan if using.

Step 10: Bake Until Golden
Preheat your oven to 375°F. Bake for 20 to 25 minutes until the exterior is deep golden brown and the cheese is visibly melted inside (you might see it peeking through small cracks). The aroma in your kitchen will be absolutely incredible. Let it cool for 3 to 5 minutes before slicing—this allows the cheese to set slightly so it doesn’t pour out everywhere.

Expert’s Nutritional Tip
Here’s something I’ve learned working with families for ten years: the quality of your deli meats matters more than people realize. Choose meats with shorter ingredient lists and no added nitrates when possible. Why? Because you’re feeding your family real food. One stromboli serves four to six people, so you’re diluting any less-ideal ingredients across multiple portions anyway. Plus, quality meats simply taste better, which means everyone’s more satisfied with reasonable portions.
Tips and Tricks
- Room temperature dough works faster – If your kitchen is cool, rising might take up to 2 hours. If it’s warm, check at 45 minutes. Either way is fine—don’t rush it by using too-warm water.
- Use parchment paper religiously – This prevents sticking and makes cleanup effortless. Plus, the bottom of your stromboli bakes more evenly on parchment.
- Don’t skip the garlic butter – This takes your stromboli from good to absolutely craveable. The flavor difference is remarkable for just 5 minutes of extra work.
- Let it rest before cutting – I know the aroma is tempting, but those 3 to 5 minutes allow the cheese to firm up just enough. Your slices will be cleaner and prettier.
- Make smaller individual stromboli – Divide dough into two portions, fill smaller rectangles, and reduce baking time to 15 to 18 minutes. Great for picky eaters who want different fillings.
- Freeze before baking, not after – Make stromboli, freeze on a baking sheet until solid, then wrap tightly. Bake from frozen, adding 5 to 8 extra minutes. You’ll have homemade stromboli ready whenever you need it.
Common Mistakes to Avoid
- Water temperature matters more than you’d think – Too hot kills the yeast. Too cold slows rising unnecessarily. Use a simple kitchen thermometer or the wrist test: it should feel warm, not hot.
- Overstuffing causes leaks – I see this constantly. People fill stromboli like it’s their last meal. Generous filling is great, but excessive filling escapes during baking and creates a mess. Moderate your instinct to stuff.
- Skipping the second rise – Some recipes skip this. Don’t. That first rise creates structure. Skipping it gives you dense, gummy stromboli instead of light, airy bread.
- Rolling too thin or too thick – Roll to about 1/4 inch thickness. Too thin and it’ll dry out. Too thick and the inside doesn’t heat through properly by the time the outside is brown.
Make-Ahead Guide
This is where stromboli becomes your secret weeknight weapon. Here’s my professional approach: Make your dough the night before. After kneading, cover and refrigerate overnight. The next day, let it come to room temperature (about 1 hour), then proceed to shaping. The cold fermentation actually develops better flavor.
Alternatively, shape your stromboli in the morning, cover it loosely, and refrigerate until dinnertime. About 30 minutes before baking, remove it from the fridge so it comes closer to room temperature. This prevents the outside from baking too fast before the inside heats through.
For maximum convenience, assemble your stromboli, freeze it on a baking sheet until solid (about 3 hours), then wrap tightly in plastic wrap. Store in your freezer for up to 3 months. Bake directly from frozen at 375°F for 30 to 35 minutes, checking at 25 minutes so the top doesn’t overbake.
Seasonal Variations
- Spring/Summer version – Add thin slices of fresh roasted red peppers and fresh basil leaves between your meat and cheese layers. The freshness brightens the richness of the cheese.
- Fall/Winter version – Caramelize some onions beforehand and add them to your filling. The sweetness complements heavier cured meats beautifully, and it’s wonderfully cozy.
- Veggie-forward option – Layer sautéed zucchini, spinach, and roasted garlic with your cheese. Perfect for mixed families where some eat meat and others don’t.
- Spicy version – Add sliced peperoncini peppers, increase red pepper flakes to 1 full teaspoon, and use sharp provolone. Great for families who love heat.
Can I Store Stromboli?
Absolutely, and it keeps beautifully. Once baked and cooled completely, wrap your stromboli tightly in plastic wrap or aluminum foil. It’ll keep in your refrigerator for up to 4 days. Reheat slices in a 350°F oven for about 8 minutes until warmed through—this maintains the bread texture better than microwaving.
For freezing, wrap your cooled stromboli in plastic wrap, then place in a freezer bag. It keeps for up to 3 months. Thaw overnight in the refrigerator, then reheat as described above.
You can also freeze unbaked stromboli. Assemble it completely, freeze on a baking sheet until solid, wrap tightly, and freeze for up to 2 months. Bake from frozen at 375°F for 30 to 35 minutes, checking at 25 minutes to ensure the top isn’t browning too quickly.
Nutrition Information
Based on USDA nutritional data, one slice of this stromboli (assuming 6 slices per stromboli) contains approximately 420 calories, 24 grams of protein, 18 grams of fat, and 38 grams of carbohydrates. The protein comes from the quality cured meats and cheese, making this genuinely satisfying for growing kids and busy adults.
The carbohydrates are primarily from the bread dough, which provides fiber and B vitamins essential for sustained energy. One slice also provides roughly 600 milligrams of sodium, so I often pair it with a vegetable-based side to balance the meal nutritionally.
Want to reduce sodium? Use lower-sodium deli meats and skip the salt garnish. Want to boost nutrition? Serve alongside fresh vegetables, as I suggested earlier. This flexibility is one reason I love teaching stromboli to families—you control the nutritional profile completely.
What Can I Serve With Stromboli?
Stromboli is substantial enough to be the star, but pairing it with the right sides elevates the entire meal. Here are my go-to combinations that make dinner feel complete without being overwhelming.
- Simple green salad with Italian vinaigrette – The acidity cuts through the richness of the cheese beautifully. I use a basic ratio of 3 parts olive oil to 1 part red wine vinegar, add minced garlic, and toss with fresh greens.
- Roasted vegetables – Baked broccoli with cheese is my absolute favorite, but roasted zucchini, bell peppers, or green beans work equally well. The vegetables add nutritional balance without competing for attention.
- Marinara sauce for dipping – While not traditional, my kids love dipping stromboli into warm marinara. It adds moisture and a tangy contrast. Use quality jarred sauce or make your own.
- Garlic bread or breadsticks – If you’re making this for a crowd, skip this and let stromboli be the carb. But for a casual family dinner, thin crispy breadsticks complement it nicely.
- Cucumber and tomato salad – Fresh, cool, and refreshing. The vegetables feel lighter than heavier sides, which is perfect since stromboli is already quite filling.
Substitutes
- All-purpose flour alternatives – If you need gluten-free, use a quality 1:1 gluten-free flour blend that includes xanthan gum. The dough will be slightly stickier—add flour a teaspoon at a time. Bread-making with GF flour requires patience, but it’s absolutely possible.
- Different meats – Skip the traditional Italian mix and use whatever your family loves. Turkey, roast beef, or even pulled pork work beautifully. Thin-slice everything for even rolling and consistent baking.
- Cheese alternatives – Provolone, fontina, or a sharp cheddar all create delicious stromboli. Mix cheeses for complexity—try half mozzarella, half sharp provolone for incredible depth.
- Vegetable additions – Layer thinly sliced red peppers, spinach, mushrooms, or sun-dried tomatoes between your meats and cheese. Just avoid overly wet vegetables; pat them dry first or the stromboli gets soggy.
- Egg wash alternative – If you’re out of eggs, brush with a little water or melted butter instead. You won’t get that golden shine, but browning happens naturally.
- Fresh yeast – Use 0.6 ounces fresh yeast instead of the dry yeast called for. Crumble it directly into your warm water with sugar. The result is essentially identical.
Stromboli Recipe
Ingredients
Method
- In the bowl of your stand mixer (or a large mixing bowl if mixing by hand), whisk together your warm water, yeast, and sugar. Let this sit undisturbed for about 5 minutes. You'll notice it become foamy and smell wonderfully yeasty—that's exactly what you want. This step ensures your yeast is alive and ready to work.

- Add the olive oil, salt, and flour to your yeast mixture. If using a stand mixer, beat on low speed for about 2 minutes until everything comes together into a shaggy dough. If mixing by hand, stir vigorously with a wooden spoon or silicone spatula until combined. Don't worry if it looks rough—that's normal at this stage.

- Switch to the dough hook on your mixer (if using one) and beat for a full 5 minutes. If kneading by hand on a lightly floured surface, work the dough for 5 full minutes with consistent pressure. The dough will transform from sticky to smooth and elastic. If it becomes too sticky during kneading, sprinkle just 1 teaspoon of flour at a time—don't overdo it. Your final dough should feel soft and slightly tacky, not dry. To test if you've kneaded enough, poke your dough with your finger. It should slowly bounce back. For extra confidence, do the windowpane test: tear off a small piece and gently stretch it thin. Hold it to the light. Does light pass through without tearing? You're done. If not, keep kneading for another minute or two.
- Place your dough in a lightly oiled bowl, turning it once to coat all sides. Cover with a clean kitchen towel or plastic wrap. Let it rise at room temperature for 1 to 1.5 hours until it's roughly doubled in size. You'll know it's ready when you gently poke it and the indentation stays rather than bouncing back.
- While the dough rises, prepare everything for filling. Layer your sliced Italian meats on a plate. Shred your cheese if you haven't already (freshly shredded really does melt better than pre-packaged). Mix together the melted butter, minced garlic, fresh parsley, and red pepper flakes in a small bowl. This garlicky butter will brush on top and create that irresistible crust.

- Turn your risen dough onto a lightly floured surface. Using your hands or a rolling pin, gently stretch and shape it into a rectangle approximately 14 by 10 inches. Don't stress about perfect dimensions—close is plenty good enough. Leave about a 1-inch border on all sides bare (you'll fold these edges later).

- Starting about an inch from one of the long edges, layer your fillings in this order: meats first, then cheese. Don't overstuff—think generous but not excessive. Leave that 1-inch border on all sides so nothing leaks out during baking. The meats should cover most of the surface, followed by an even layer of cheese.

- Starting from the long edge closest to your fillings, roll the dough tightly toward the opposite edge, using gentle but firm pressure. You're creating a log, not a burrito—consistent tension matters. Once fully rolled, pinch the seam and both short ends closed so nothing escapes during baking. Place seam-side down on a parchment-lined baking sheet.

- Beat together one large egg with 1 tablespoon water. Brush this mixture all over your stromboli. This creates that beautiful golden-brown exterior everyone loves. Now brush your prepared garlic butter mixture over the egg wash. Sprinkle generously with flaky sea salt, dried parsley, and Parmesan if using.

- Preheat your oven to 375°F. Bake for 20 to 25 minutes until the exterior is deep golden brown and the cheese is visibly melted inside (you might see it peeking through small cracks). The aroma in your kitchen will be absolutely incredible. Let it cool for 3 to 5 minutes before slicing—this allows the cheese to set slightly so it doesn't pour out everywhere.

Notes
FAQs
Can I make stromboli dough without a stand mixer?
Absolutely. I made stromboli without a stand mixer for years before upgrading. Simply whisk the warm water, yeast, and sugar in a large bowl. Let it rest 5 minutes. Add oil, salt, and flour, then stir vigorously with a wooden spoon or sturdy spatula until everything combines into a shaggy dough. Transfer to a lightly floured surface and knead by hand for 5 to 7 minutes. It’s actually quite meditative, and your arms get a mini workout. The result is identical—don’t let lack of equipment stop you.
Why is my stromboli dough sticky and hard to work with?
This usually means one of two things: either your water was too warm (killing some yeast activity) or you didn’t knead long enough (gluten structure isn’t developed). The windowpane test I mentioned earlier catches this immediately. Additionally, humidity in your kitchen affects dough texture—on humid days, you might need slightly less water. Add water a tablespoon at a time if adjusting. Most importantly, trust the process over strict measurements. Your hands are the best guide for dough consistency.
Can I make stromboli with store-bought pizza dough?
You absolutely can, and I won’t judge. Quality store-bought dough from your bakery section or local pizzeria works beautifully. You’ll skip the mixing and rising steps entirely—game changer on frantic evenings. Simply shape, fill, and bake, following the same instructions. It’s not from-scratch, but it’s still infinitely better than frozen stromboli and gets dinner on the table faster. Sometimes good enough truly is good enough, and I’m a real-life mother who gets that completely.
How do I prevent my stromboli from cracking on top during baking?
Cracks happen when the exterior sets before the inside rises, creating tension. Several things help: don’t overbake (20 to 25 minutes is the window), ensure your oven temperature is accurate (use an oven thermometer if unsure), and let your shaped stromboli rest at room temperature before baking if you’ve refrigerated it. Also, slashing the top decoratively with a sharp knife (three parallel cuts about 1/4-inch deep) can prevent random cracking by channeling steam intentionally. Minor cracks are completely normal and don’t affect flavor at all.
Can I make a calzone instead of stromboli?
Absolutely. The dough is identical. Instead of rolling the dough into a rectangle and filling, shape it into a larger circle, place filling on one half, fold it in half, and seal the edges by pressing and crimping with a fork. Use the same egg wash and baking instructions. Calzone is actually easier for portion control since each person gets their own. Stromboli is more impressive for groups. Choose based on your dinner needs.
What’s the difference between stromboli and pizza rolls?
Great question. Stromboli is one large rolled loaf with a bread exterior and filled with meats and cheese. Pizza rolls are smaller, often deep-fried, and sometimes contain tomato sauce in the filling. Think of stromboli as the gourmet adult version and pizza rolls as the casual snack version. Stromboli has more bread-to-filling ratio, creating that satisfying chewy texture. Pizza rolls are more gimmicky. I love both, honestly, but stromboli is what I serve when I want everyone at the table feeling special.
More Recipes You’ll Love
- Baked Ziti Sausage Recipe – Another crowd-pleasing comfort dish that’s equally freezer-friendly and perfect for feeding a family without fuss
- Barbacoa Recipe Instant Pot – An easy protein that’s wonderful in sandwiches, on salads, or as a stromboli filling variation if you’re feeling adventurous
- Bacon Smokies Recipe – A fun appetizer or side that brings the same cozy, gathered-around-the-table energy as stromboli night
- my go-to banana bread – For when you want to end stromboli dinner on a sweet note with a homemade dessert that feels just as special
I genuinely hope this stromboli recipe becomes part of your family’s regular rotation. There’s something powerful about putting real food—that you’ve made with your own hands—on the table. Your kids will taste the difference. They’ll remember these meals. And honestly? You’ll feel that satisfaction too, knowing you created something nourishing and delicious without stress.
Happy Cooking!