This post contains affiliate links. As an Amazon Associate I earn from qualifying purchases.
There’s nothing quite like a homemade sloppy joe to bring the whole family to the dinner table with genuine excitement. I pair mine with baked broccoli with cheese and a simple side salad to sneak in extra nutrition without anyone noticing. This recipe has saved my sanity more times than I can count during those chaotic Tuesday nights when everyone’s running in different directions.
The Memory That Started It All
I’ll never forget the Tuesday evening when my oldest came home from school completely deflated. He’d had a rough day with his classmates, and honestly, I was running on empty myself after back-to-back nutrition consultations with clients. The last thing I wanted to do was spend an hour in the kitchen making something complicated.
So I did what any tired mom-dietitian would do—I reached for ground beef, grabbed the basics from my pantry, and threw together what would become our family’s most-requested dinner. Watching my kids dig into those towering sandwiches, sauce dripping everywhere, laughter returning to the dinner table, I realized something profound: the best family meals aren’t always the fanciest ones. They’re the ones that come together quickly, taste genuinely delicious, and free you up to actually enjoy your people.
That’s exactly what this best sloppy joes recipe does. It’s pure comfort, total simplicity, and absolute family magic.

What Is a Best Sloppy Joes Recipe?
A sloppy joe is a beloved American sandwich featuring seasoned, saucy ground beef served on soft buns. The beauty of this dish lies in its humble simplicity—there’s no fancy technique required, just quality ingredients layered with the right flavor balance.
Contrary to what many people think, an authentic sloppy joe isn’t just ketchup and beef. The magic happens when you build a real sauce foundation using tomato sauce, Worcestershire sauce, and mustard, then layer it with sautéed aromatics and just the right touch of sweetness. My version strikes that perfect balance between savory, slightly tangy, and subtly sweet—the exact profile that makes kids and adults alike ask for seconds.
The “best” version comes down to a few key factors: using lean ground beef so you’re not dealing with excess grease, building flavor through proper vegetable sautéing, and simmering long enough for all those flavors to meld beautifully without drying out the meat.
Why You’ll Love This Best Sloppy Joes Recipe
- Ready in under 30 minutes – From raw ingredients to plated dinner, this comes together faster than most takeout options. I’m talking about 25 minutes flat on a busy weeknight.
- One-pan simplicity – You’ll dirty one large skillet and one bowl. Cleanup is genuinely minimal, which means more time with your family and less time scrubbing.
- Hidden vegetable winning strategy – The onions, peppers, and garlic cook down into the sauce, creating a naturally sweet, deeply flavored base that even veggie-resistant kids don’t notice.
- Naturally lean and protein-packed – Using 85-90% lean ground beef keeps this nutritionally solid while maintaining moisture and flavor. You’re getting real protein without a grease slick.
- Incredibly affordable – Ground beef and pantry staples mean this feeds a family of five for about the cost of two takeout meals.
- Customizable for every palate – Need it spicier? Add hot sauce. Want it sweeter? Increase the brown sugar slightly. This recipe is forgiving and adaptable to your family’s exact preferences.
- Makes excellent leftovers – The sauce actually tastes better the next day as flavors continue to marry. Perfect for meal prep or those unexpected late nights.
The Ingredients
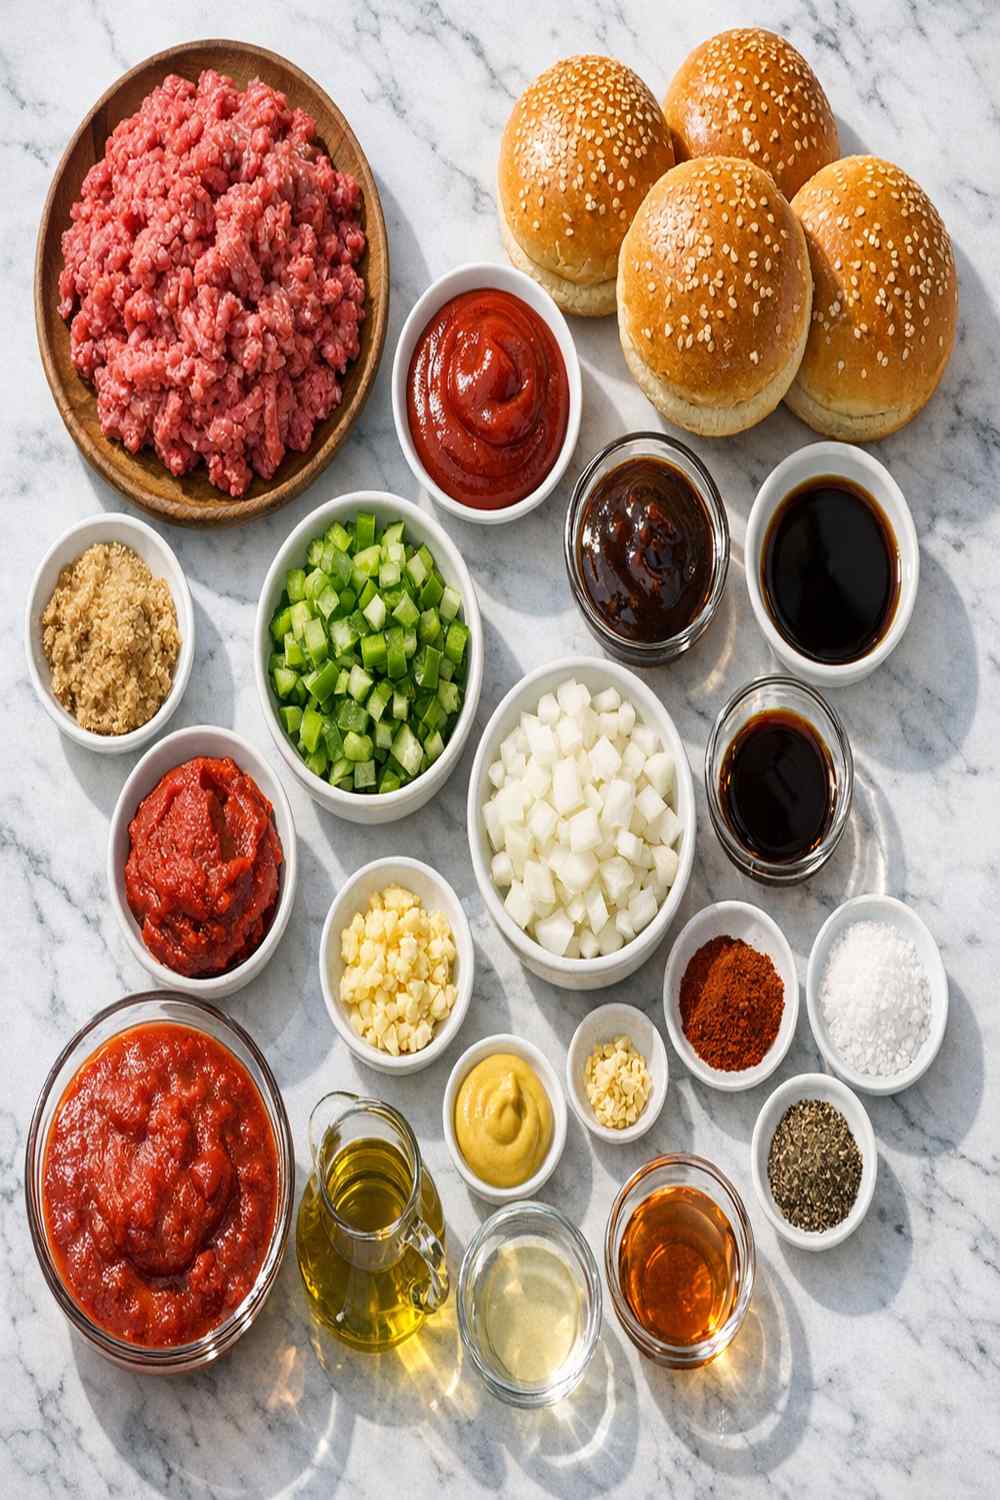
I’ve carefully selected each ingredient to create layers of authentic flavor while keeping your shopping list short and simple. Everything here serves a purpose—nothing is fussy or hard to find. Makes 5 generous sandwiches.
- 1 small onion (finely chopped for quick cooking and natural sweetness)
- 1 small green bell pepper (seeded and finely diced, about ½ cup—adds body without overpowering the sauce)
- 1 tablespoon extra light olive oil (or any high-heat cooking oil for sautéing)
- 2 tablespoons fresh apple cider vinegar (optional but adds brightness to the final sauce)
- 2-3 teaspoons brown sugar (adds roundness; start with 2 and adjust)
- 15 ounces tomato sauce (canned is perfectly fine and saves time)
- 1½ teaspoons yellow mustard (or adjust to taste—this brightens everything)
- ¼ cup ketchup (adds subtle sweetness and body to the sauce)
- ½ teaspoon fine sea salt (or adjust to taste)
- 1 tablespoon Worcestershire sauce (the secret to authentic sloppy joe depth)
- ¼ teaspoon freshly ground black pepper (or adjust to taste)
- 1 pound lean ground beef (85%-90% lean creates the best texture and requires less draining)
- 3 garlic cloves (minced fresh, never jarred, for clean aromatic flavor)
- 5 hamburger buns (toasted if desired for better texture and structure)
How to Make the Best Sloppy Joes Recipe
I’m going to walk you through each step with real timing and honest details. This method builds flavor progressively, so don’t rush the sautéing stages. You’ll notice the difference immediately when you taste it.
Step 1: Build Your Sauce Foundation
Grab a medium-sized bowl and combine your tomato sauce, ketchup, Worcestershire sauce, mustard, and brown sugar. Give it a good stir until everything is completely incorporated and the brown sugar dissolves. This is your flavor base—take 30 seconds to make sure it’s smooth and unified. The sauce should smell aromatic and slightly complex, not just tomatoey. Set it to the side while you prep your beef and vegetables.

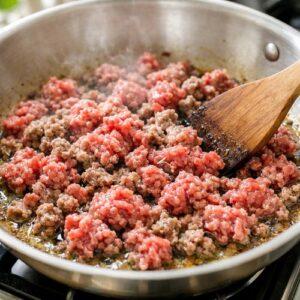
Step 2: Brown the Ground Beef Properly
Place a large skillet or Dutch oven over medium-high heat and add your olive oil. Once the oil is shimmering and hot (about 1 minute), add your pound of ground beef. Don’t stir it immediately—let it sit for 2-3 minutes to develop a nice brown crust on the bottom. This creates real flavor through the Maillard reaction, which is something I emphasize constantly with my nutrition clients.
After 2-3 minutes, break up the beef with a wooden spoon or spatula, stirring and cooking for another 2-3 minutes until no pink remains and the meat is completely cooked through. If you see a significant amount of excess fat pooling at the bottom, tilt the pan slightly and use a spoon or paper towels to remove it.
Season the cooked beef immediately with your salt and pepper, stirring to distribute evenly. The beef should look crumbly and nicely browned, not pale or wet.

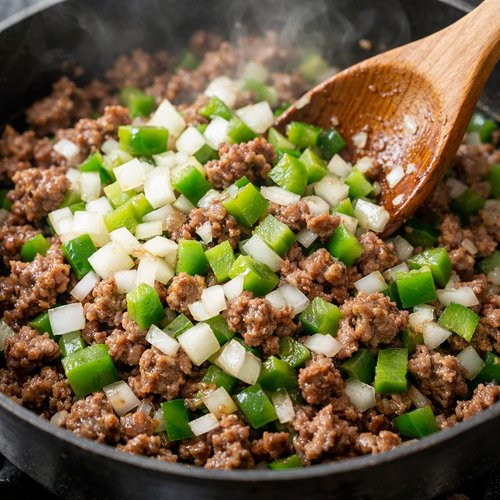
Step 3: Add the Vegetables and Build Aroma
Reduce your heat to medium and stir in your finely chopped onion and diced green bell pepper. Cook these together for about 5 minutes, stirring occasionally. The vegetables will begin to soften and become translucent, and the onions will become fragrant and slightly caramelized at the edges. This is the flavor-building stage that elevates this from basic to genuinely delicious.
You’ll notice the skillet becomes more aromatic—that’s your signal that the vegetables are releasing their natural sugars and flavors. Don’t skip this step by rushing it.
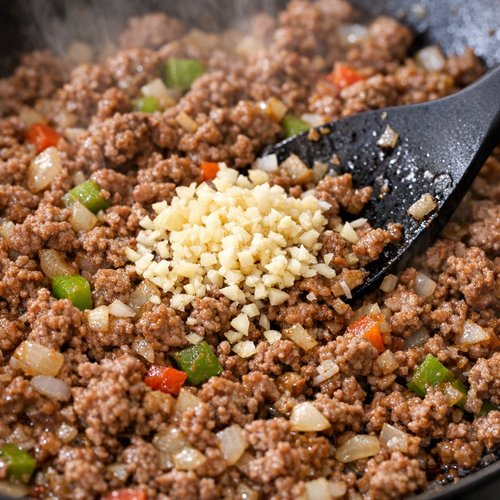
Step 4: Bloom the Garlic
Add your minced fresh garlic directly to the vegetables and beef mixture. Stir constantly for just 30 seconds to 1 minute. This quick cook is essential—you want the garlic fragrant and soft, not burned and bitter. If you cook it too long, it turns harsh and unpleasant. Keep your nose alert; when it smells absolutely amazing, you’re done.
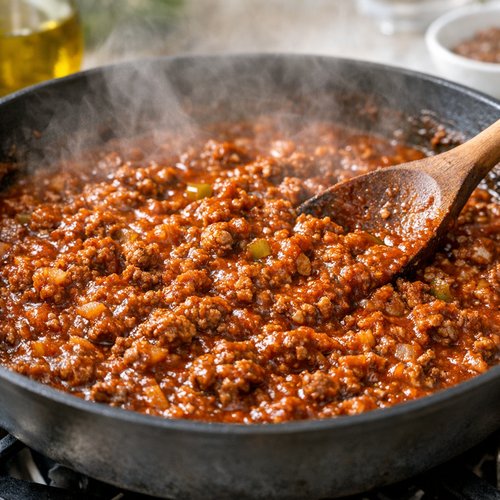
Step 5: Bring Everything Together
Pour your prepared sauce directly into the skillet with the beef and vegetables. Stir everything together thoroughly, making sure no dry bits of beef or vegetables remain at the bottom of the pan. The mixture will look loose and saucy right now—that’s exactly right.
Bring the entire mixture to a gentle boil over medium-high heat, stirring occasionally. You should see bubbles breaking the surface steadily. Once it reaches a boil, reduce the heat to low immediately.

Step 6: Simmer to Perfection
Let the sloppy joe mixture simmer uncovered on low heat for 10-15 minutes. During this time, the sauce thickens, flavors deepen and marry together, and any raw tomato flavor mellows into something truly delicious. Stir occasionally to prevent sticking.
You’ll notice the sauce gradually becoming thicker and the color deepening slightly. After 10 minutes, check the consistency. If you prefer a thicker, less saucy texture, simmer the full 15 minutes. If you like it looser and saucier, stop at 10 minutes or add a splash of water.
Taste the mixture and adjust seasonings as needed. Want it tangier? Add a squeeze of fresh lime juice or apple cider vinegar. Want it sweeter? Add another ½ teaspoon of brown sugar. This is your moment to personalize it to your family’s exact preferences.
Step 7: Toast the Buns and Assemble
While your sauce simmers, warm your hamburger buns. I prefer toasting them lightly in a skillet with just a touch of butter or in a toaster oven at 350°F for 2-3 minutes. Toasted buns hold up beautifully to the sauce and add a subtle richness that untoasted buns simply don’t provide.
Once everything is ready, place each warm bun on a plate, spoon generous amounts of the sloppy joe mixture onto the bottom half, and top with the bun lid. Serve immediately with napkins—lots of them!

Expert’s Nutritional Tip
Here’s something I always share with my clients: the combination of tomato sauce and Worcestershire sauce in this recipe creates a naturally umami-rich base that satisfies your taste buds more completely, which means you’re less likely to overshoot portions or reach for seconds out of hunger rather than genuine appetite.
Additionally, using 85-90% lean ground beef instead of regular ground beef cuts about 10 grams of saturated fat per serving while maintaining the moisture and flavor that makes this sandwich craveable. From a nutritional standpoint, you’re getting approximately 24 grams of protein per serving without excessive saturated fat—that’s a genuinely balanced weeknight meal.
Tips and Tricks
- Make it your own with vegetable swaps – Not a fan of green peppers? Use finely diced red bell pepper, shredded carrots, or even diced mushrooms. The cooking time remains the same, and each variation tastes fantastic.
- Toast those buns – This single step transforms the entire eating experience. Toasted buns have a subtle crunch, better structure, and they don’t immediately turn to mush under the sauce.
- Taste as you go – Brown sugar and seasonings vary slightly by brand. Rather than following measurements blindly, taste and adjust. This teaches your family to develop real palate awareness and it ensures the flavor is exactly right.
- Use fresh minced garlic, not jarred – I know jarred feels convenient, but fresh garlic creates a noticeably cleaner, brighter flavor. Mince it fresh right before cooking—it takes 30 seconds with a sharp knife.
- Don’t skip the vegetable sautéing stage – I’ve watched countless home cooks dump vegetables into the sauce without cooking them first. Those uncooked vegetables create a watery, less-developed flavor. The 5-minute vegetable sauté is non-negotiable.
- Break up the meat thoroughly while browning – Larger chunks of beef create an uneven texture. Use your spoon or spatula to break everything into small, uniform pieces so the sauce coats evenly.
- Low heat for simmering is essential – High heat causes splashing, uneven cooking, and potential burning on the bottom. Keep it low and gentle for the full 10-15 minutes.
Make-Ahead and Meal Prep Guide
One of my favorite strategies is preparing this sauce ahead and reheating it when life gets hectic. The flavors actually improve after a day or two as everything continues to marry together.
For advance preparation: You can complete the entire recipe through Step 6 up to 3 days ahead. Allow the sloppy joe mixture to cool completely, then transfer it to an airtight container and refrigerate. When you’re ready to serve, reheat it gently over medium-low heat, stirring occasionally, until it reaches serving temperature. Add a splash of water if it seems too thick after refrigeration.
For freezing: This recipe freezes beautifully for up to 3 months. Cool the sauce completely, transfer to a freezer-safe container or freezer bags, label with the date, and freeze. Thaw overnight in the refrigerator before reheating. I often make a double batch on a Sunday afternoon, then portion it into individual containers for grab-and-go weeknight dinners.
For busy mornings: Prep your onions, peppers, and garlic the evening before. Store them together in a sealed container in the refrigerator. When dinner time arrives, you’ll literally shave 5 minutes off your cooking time, and everything else proceeds exactly as written.
Common Mistakes to Avoid
- Using regular ground beef instead of lean – Regular ground beef contains significantly more fat, which creates a greasy, less-pleasant final product. The extra time draining grease isn’t worth it. Lean beef costs slightly more but is genuinely worth the investment.
- Skipping the vegetable sauté stage – I mentioned this in tips, but it bears repeating because it’s the most common mistake I see. Raw vegetables add nothing but texture and water. Sautéing them develops genuine flavor.
- Rushing the simmering stage – Sloppy joes need at least 10 minutes to thicken and for flavors to develop. Serving it immediately after adding sauce creates a watery, underdeveloped taste.
- Adding too much brown sugar at once – Remember, you can always add more sweetness. You cannot remove it. Start with 2 teaspoons and taste before adding more.
Can I Store the Best Sloppy Joes Recipe?
Absolutely, and this is one of my favorite things about this recipe from a practical standpoint.
Refrigerator storage: Transfer any leftover sloppy joe mixture to an airtight container and refrigerate for up to 4 days. The flavor actually improves as it sits, making Day 2 taste better than Day 1. Reheat gently over medium-low heat, stirring occasionally, until warmed through. Add a splash of water if the sauce has thickened during storage.
Freezer storage: This recipe freezes exceptionally well for up to 3 months. Cool the mixture completely before transferring to freezer-safe containers or zip-top freezer bags. Label with the date. Thaw overnight in the refrigerator and reheat as described above.
Bun storage: Store hamburger buns separately in a cool, dry place or in the freezer in an airtight bag for up to 2 weeks. Toast them fresh just before serving.
Nutrition Information
Per serving (one sandwich with approximately 1 cup filling on one bun), based on USDA nutrition database standards: approximately 385 calories, 24 grams protein, 35 grams carbohydrates, 13 grams fat (of which 5 grams are saturated), 2.5 grams dietary fiber, and 680 milligrams sodium.
The protein-to-carbohydrate ratio makes this a naturally balanced lunch or dinner option. The fiber content, while modest, comes from the tomato sauce and whole grain buns if you choose them. The sodium level is reasonable for a prepared sauce; if you’re sodium-conscious, use low-sodium tomato sauce and reduce additional salt to taste.
What Can I Serve With the Best Sloppy Joes Recipe?
While sloppy joes are absolutely satisfying on their own, I always add one or two simple sides to create a truly balanced, appealing plate for my family. My go-to approach is pairing something crunchy with something bright and green.
- Baked broccoli with cheese – This recipe is literally my secret weapon for getting kids excited about vegetables. The cheese makes them forget they’re eating broccoli.
- Crispy oven-baked potato wedges – Seasoned with garlic powder and paprika, they add texture contrast and help satisfy heartier appetites without adding much cooking time.
- Simple garden salad – A basic green salad with a light vinaigrette adds freshness and rounds out the meal nutritionally. The acidity of the dressing complements the richness of the sloppy joe perfectly.
- Steamed corn on the cob – Natural sweetness that pairs beautifully, plus kids generally love it. Butter and a sprinkle of salt, done.
- Cucumber and tomato salad – Especially lovely in warmer months. The cool, crisp vegetables balance the warm, saucy sandwich.
- Carrot sticks with ranch dip – Crunchy and kid-approved, requiring zero cooking. Perfect when you’re already at your energy limit for the evening.
Substitutes
- Ground turkey instead of beef – Use the same amount. Ground turkey is leaner, creating a slightly less rich but still delicious result. Cook it the same way, breaking it into small pieces as it browns.
- Green bell pepper alternative: shredded carrots – If your family dislikes bell peppers, use ½ cup shredded carrots. They cook down into the sauce beautifully, adding natural sweetness without any detectable chunks.
- Brown sugar swap: honey or maple syrup – Use slightly less than the brown sugar amount called for (try 1½ teaspoons) because honey and maple syrup are sweeter. Stir it in well.
- Worcestershire sauce alternative: soy sauce or tamari – Use 1 teaspoon instead of the full tablespoon because soy sauce is saltier. Add the extra ½ teaspoon if you taste and feel it needs more depth.
- Regular hamburger buns: brioche buns or ciabatta rolls – Either works beautifully and changes the sandwich experience slightly. Brioche adds richness; ciabatta adds interesting texture.
- Fresh garlic: garlic powder – Only in emergencies! Use ⅛ teaspoon garlic powder in place of the fresh garlic. The flavor won’t be as bright, but it still works in a pinch.
Seasonal Variations
Spring version: Add 2 tablespoons finely minced fresh chives or green onions right before serving. The bright, mild onion flavor adds springtime freshness.
Summer version: Reduce the brown sugar to 1½ teaspoons and add 1 tablespoon fresh lime juice and a pinch of cumin. This creates a slightly spiced, fresher-tasting version that feels lighter in warm weather.
Fall version: Add ⅛ teaspoon cayenne pepper or a dash of hot sauce for subtle warmth. Increase brown sugar to 3 teaspoons for deeper, cozier flavor.
Winter version: Add 2 teaspoons balsamic vinegar for rich depth, and consider using brioche buns for extra indulgence. Serve with something warm and hearty on the side.
Best Sloppy Joes Recipe
Ingredients
Method
- Grab a medium-sized bowl and combine your tomato sauce, ketchup, Worcestershire sauce, mustard, and brown sugar. Give it a good stir until everything is completely incorporated and the brown sugar dissolves. This is your flavor base—take 30 seconds to make sure it's smooth and unified. The sauce should smell aromatic and slightly complex, not just tomatoey. Set it to the side while you prep your beef and vegetables.

- Place a large skillet or Dutch oven over medium-high heat and add your olive oil. Once the oil is shimmering and hot (about 1 minute), add your pound of ground beef. Don't stir it immediately—let it sit for 2-3 minutes to develop a nice brown crust on the bottom. This creates real flavor through the Maillard reaction, which is something I emphasize constantly with my nutrition clients. After 2-3 minutes, break up the beef with a wooden spoon or spatula, stirring and cooking for another 2-3 minutes until no pink remains and the meat is completely cooked through. If you see a significant amount of excess fat pooling at the bottom, tilt the pan slightly and use a spoon or paper towels to remove it. Season the cooked beef immediately with your salt and pepper, stirring to distribute evenly. The beef should look crumbly and nicely browned, not pale or wet.
- Reduce your heat to medium and stir in your finely chopped onion and diced green bell pepper. Cook these together for about 5 minutes, stirring occasionally. The vegetables will begin to soften and become translucent, and the onions will become fragrant and slightly caramelized at the edges. This is the flavor-building stage that elevates this from basic to genuinely delicious. You'll notice the skillet becomes more aromatic—that's your signal that the vegetables are releasing their natural sugars and flavors. Don't skip this step by rushing it.

- Add your minced fresh garlic directly to the vegetables and beef mixture. Stir constantly for just 30 seconds to 1 minute. This quick cook is essential—you want the garlic fragrant and soft, not burned and bitter. If you cook it too long, it turns harsh and unpleasant. Keep your nose alert; when it smells absolutely amazing, you're done.

- Pour your prepared sauce directly into the skillet with the beef and vegetables. Stir everything together thoroughly, making sure no dry bits of beef or vegetables remain at the bottom of the pan. The mixture will look loose and saucy right now—that's exactly right. Bring the entire mixture to a gentle boil over medium-high heat, stirring occasionally. You should see bubbles breaking the surface steadily. Once it reaches a boil, reduce the heat to low immediately.

- Let the sloppy joe mixture simmer uncovered on low heat for 10-15 minutes. During this time, the sauce thickens, flavors deepen and marry together, and any raw tomato flavor mellows into something truly delicious. Stir occasionally to prevent sticking. You'll notice the sauce gradually becoming thicker and the color deepening slightly. After 10 minutes, check the consistency. If you prefer a thicker, less saucy texture, simmer the full 15 minutes. If you like it looser and saucier, stop at 10 minutes or add a splash of water. Taste the mixture and adjust seasonings as needed. Want it tangier? Add a squeeze of fresh lime juice or apple cider vinegar. Want it sweeter? Add another ½ teaspoon of brown sugar. This is your moment to personalize it to your family's exact preferences.

- While your sauce simmers, warm your hamburger buns. I prefer toasting them lightly in a skillet with just a touch of butter or in a toaster oven at 350°F for 2-3 minutes. Toasted buns hold up beautifully to the sauce and add a subtle richness that untoasted buns simply don't provide. Once everything is ready, place each warm bun on a plate, spoon generous amounts of the sloppy joe mixture onto the bottom half, and top with the bun lid. Serve immediately with napkins—lots of them!

Notes
FAQs
Can I make this recipe in a slow cooker?
Yes! Brown the beef and vegetables in a skillet first (Steps 2-4), then transfer everything to a slow cooker. Add your prepared sauce, stir well, and cook on LOW for 3-4 hours or on HIGH for 1.5-2 hours. The low-and-slow method actually creates incredibly tender, well-blended flavors. I love this method when I know dinner time will be chaotic—everything’s ready whenever you need it.
What if my sauce is too thick or too thin?
Too thick? Add water one tablespoon at a time, stirring well, until you reach your preferred consistency. Too thin? Simply simmer uncovered for another 5-10 minutes to reduce and thicken. Remember, the sauce thickens further as it cools, so if you’re serving immediately, it should be slightly looser than your final desired consistency.
Is this recipe kid-friendly if my children have specific allergies?
This recipe contains beef and gluten (in the buns), so those are the main allergen considerations. It’s naturally egg-free and dairy-free in the filling itself. For gluten-free families, use gluten-free buns and ensure your Worcestershire sauce is certified gluten-free (most are, but verify). For specific allergies, always read ingredient labels on bottled sauces.
How can I make this recipe spicier for adults?
Add ½ teaspoon cayenne pepper or ½ teaspoon smoked paprika when you add the vegetables, or stir in hot sauce to taste during the simmering stage. For a truly spicy version, add 1 teaspoon jalapeño hot sauce or fresh diced jalapeños to the vegetables. Start small—you can always add more heat, but you cannot remove it.
Can I use ground chicken instead of beef?
You can, though the result will be noticeably leaner and less rich. Use the same amount of ground chicken and cook it using the same method. The texture will be slightly different, and you may want to add an extra tablespoon of ketchup or reduce the cooking time slightly to maintain moisture. Ground turkey is honestly a better substitute than chicken because it’s closer in fat content to lean beef.
More Recipes You’ll Love
- BBQ Beef Recipe – Another incredible ground beef option that’s equally quick and crowd-pleasing, with a different flavor profile that works beautifully for variety-loving families.
- Baked Broccoli Recipe With Cheese – The perfect vegetable side that transforms even the pickiest eaters into enthusiastic broccoli consumers.
- my go-to banana bread – A naturally sweet, comforting dessert that works perfectly as an after-dinner treat following your sloppy joe meal.
Final Thoughts
This best sloppy joes recipe has become my go-to answer when friends ask me what to make for busy weeknights. It’s proof that the best family meals don’t require complexity or fancy ingredients—they just require real flavor, honest care, and a willingness to bring everyone together around something delicious.
I hope this recipe becomes as beloved in your home as it is in mine. Make it your own, adjust it to fit your family’s exact preferences, and don’t worry about making it perfect. The messiest, most joyful dinners are often the best ones.
Happy Cooking!