This post contains affiliate links. As an Amazon Associate I earn from qualifying purchases.
Pizza bread is my secret weapon on nights when everyone’s hungry and time is tight. This pillowy, cheesy loaf comes together with minimal effort and tastes like you spent hours in the kitchen. Pair it with a fresh salad or serve it alongside New York Style Pizza for a complete pizza night at home. The crispy exterior and tender, flavorful interior with pockets of pepperoni and melted cheese keeps my kids coming back for seconds every single time.
Why My Family Calls This “The Bread That Changed Everything”
I’ll never forget the Tuesday night when my oldest came home with a huge soccer tournament the next morning. I’d completely forgotten about it, and everyone was stressed—me included. I had bread dough in the refrigerator from the weekend, some pepperoni in the drawer, and thirty minutes before bedtime.
I shaped that dough, threw in the toppings, and while it baked, my kids actually sat at the table together without screens. They talked about their fears about the tournament. We all ate this warm, comforting bread together, and somehow the nervous energy transformed into something lighter.
That bread taught me something I now share with every family I work with: the right food at the right time isn’t just about nutrition—it’s about connection. And pizza bread? It’s pure connection on a plate.

What is Pizza Bread?
Pizza bread is an Italian-inspired artisan loaf that brings all the flavors you love about pizza into one stunning, shareable bread. Unlike pizza itself, this dough uses a long, slow fermentation process that develops incredible flavor and texture naturally over time.
The magic happens in the fridge. Over 12 to 72 hours, the dough develops a complex, slightly tangy taste and an open, airy crumb structure. When you bake it in a screaming-hot Dutch oven, you get that beautiful, crispy crust that crackles when you slice into it.
What makes this version special is how the pepperoni, cheese, and herbs are woven throughout the dough rather than piled on top. Every bite tastes like pizza, but the bread itself stands as a star ingredient. It’s rustic, it’s impressive, and honestly, it feels like a celebration every time you serve it.
Why You’ll Love This Pizza Bread Recipe
- Make-ahead magic – Mix the dough on Sunday, refrigerate it, and bake fresh bread whenever you need it through Wednesday. This is the ultimate busy-family hack.
- Minimal hands-on time – Total active time is about 20 minutes spread across three days. The oven and time do the heavy lifting.
- Kid-approved flavors – Pepperoni, cheese, and herbs speak every child’s language. I’ve never had a kid refuse this bread.
- One pot, one dough, endless meals – Serve it as a side to pasta, alongside salad, with soup, or on its own. It’s that versatile.
- Impresses without stress – This looks like bakery-quality bread, but the long fermentation does all the work for you. Your guests will be amazed.
- Freezer-friendly – Bake it, cool it, slice it, and freeze it. Toast slices for quick breakfasts or warm them for dinner accompaniments throughout the month.
- Naturally flavorful – The slow fermentation means you don’t need a mile-long ingredient list. The dough develops rich, complex flavor all on its own.
The Ingredients
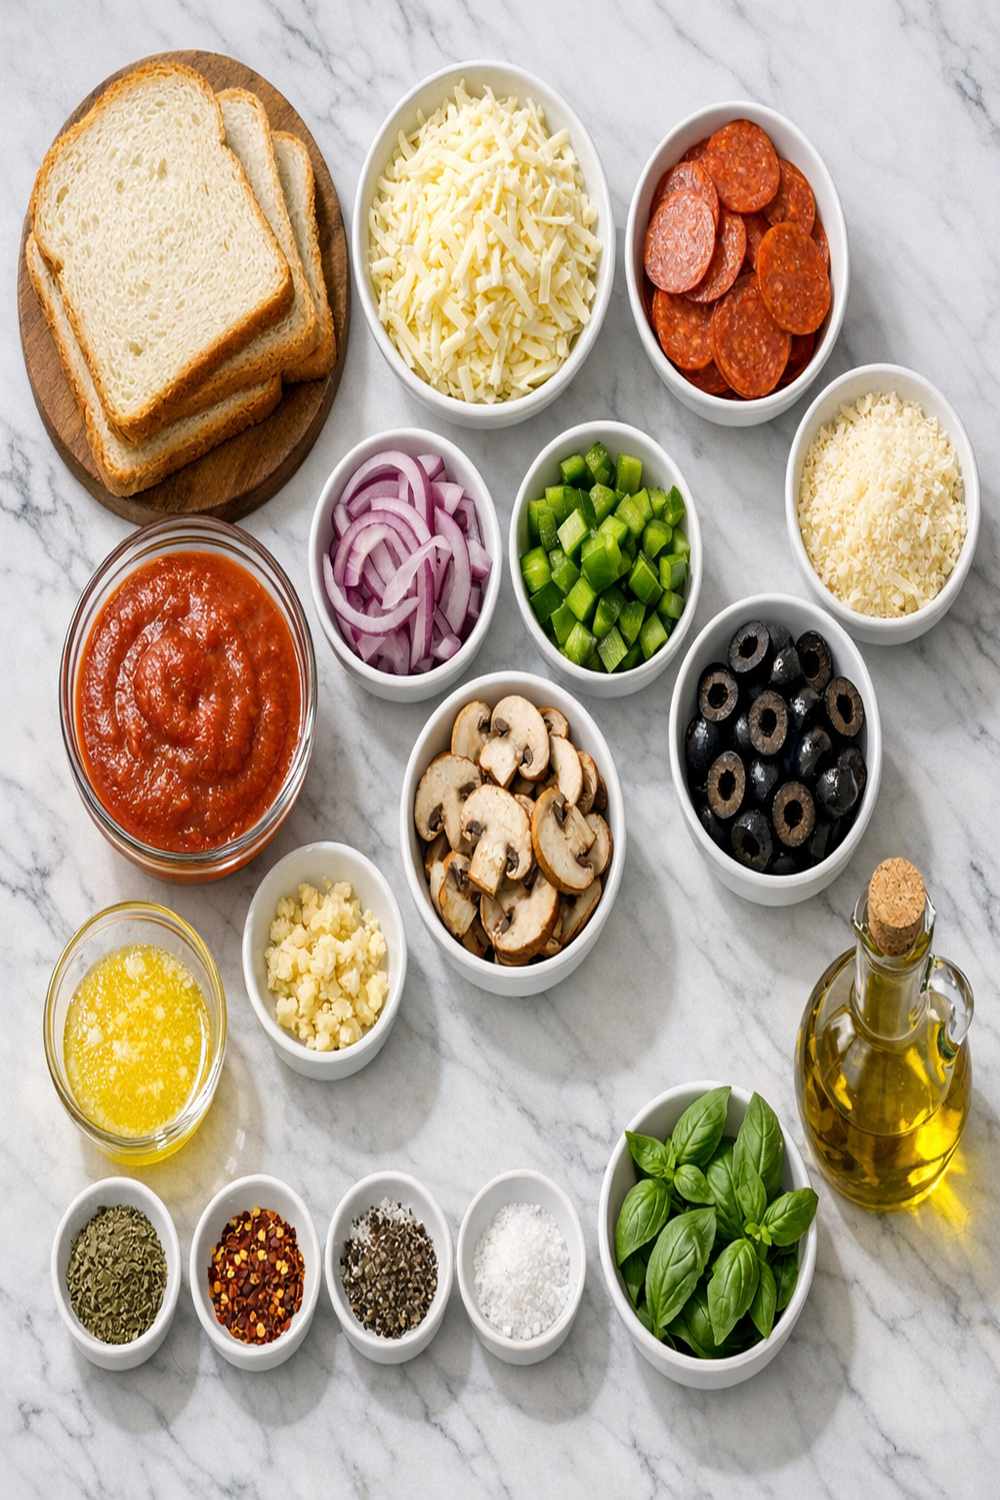
I’ve organized these ingredients by category to make shopping and prep super simple. Most of these are pantry staples in my kitchen already, which means I can make this bread almost anytime inspiration strikes. The beauty of this recipe is that it relies on quality basics rather than hard-to-find specialty items.
For the Dough
- 440g bread flour (about 3⅓ cups, spooned and leveled)
- 2 teaspoons coarse salt (this seasons the dough and controls fermentation)
- 1½ cups (360 ml) water (room temperature, about 70°F)
- 2 teaspoons instant or active dry yeast (either works beautifully)
- 1 teaspoon granulated sugar or honey (feeds the yeast)
For the Flavoring
- 1 teaspoon dried basil (adds earthiness)
- ¼ teaspoon crushed red pepper flakes (optional, but I use them)
- 1½ teaspoons garlic powder (distributed throughout for consistent flavor)
- 2 teaspoons dried oregano (the pizza signature)
For the Add-Ins
- 1 heaping cup (135g) chopped pepperoni, sun-dried tomatoes packed in oil and drained, and/or olives (pick your favorites or use a combination)
- 1 cup (113g) shredded mozzarella cheese (low-moisture works best)
For the Hot Honey Butter Topping
- Pinch of crushed red pepper flakes (adjust to your heat preference)
- ⅛ to ¼ teaspoon flaky sea salt or coarse salt (to taste)
- 1 tablespoon confectioners’ sugar (adds subtle sweetness)
- ½ cup (113g) unsalted butter (softened to room temperature)
- 3 tablespoons (63g) honey (raw or regular)
Yield: Makes 1 large loaf (about 8 to 10 generous slices)
How to Make Pizza Bread?
This recipe spans three days, but I promise you won’t feel like you’re working the whole time. The dough does most of the heavy lifting while you live your life. I’ve broken this into digestible steps that feel manageable, even on your busiest days.
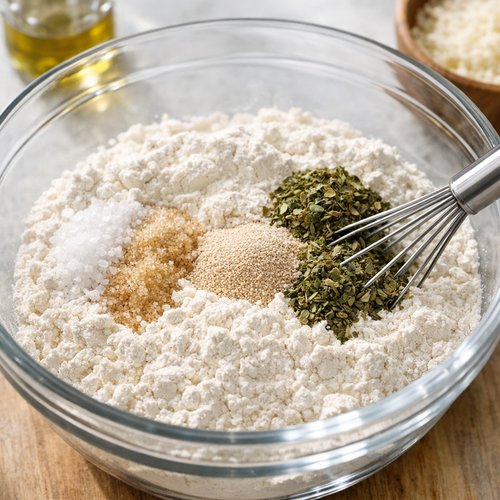
Step 1: Mix Your Dry Ingredients and Create the Base Dough
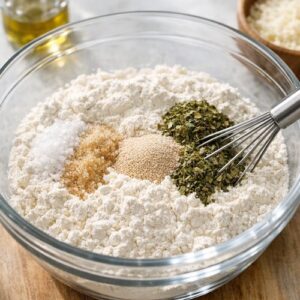
Grab a large mixing bowl—don’t grease it—and whisk together your bread flour, instant yeast, coarse salt, sugar or honey, dried oregano, dried basil, garlic powder, and crushed red pepper flakes if using. Whisking these dry ingredients together ensures the yeast is evenly distributed and your herbs are spread throughout rather than clumping up.
Now here’s the key: use a silicone spatula or wooden spoon to fold in your chopped pepperoni, sun-dried tomatoes or olives, and shredded mozzarella cheese. Make sure everything is mixed evenly so you get these delicious bits in every slice.
Pour in your room-temperature water. Using your spatula, gently mix everything together. The dough will look shaggy and dry at first—this is completely normal! Keep stirring and folding the dough over itself for about two minutes. You’ll notice the flour gradually absorbing the water.
If some flour still clings to the sides of the bowl, wet your hands slightly and gently work the dough by hand until all the flour is moistened and you have one sticky, cohesive mass. Shape it roughly into a ball in the bowl. It doesn’t need to be perfect. Trust the process.
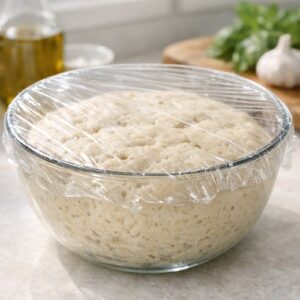
Step 2: First Rise at Room Temperature
Cover your mixing bowl tightly with plastic wrap or aluminum foil. Leave it on your counter at room temperature. Allow this to rise for exactly 3 hours. During this time, the yeast activates and the dough will roughly double in size. You’ll see lots of air bubbles forming on the surface, and the dough will stick to the sides of the bowl. This is gorgeous and exactly what we want.
I usually set a phone reminder for this step because I’ve definitely lost track of time before! After three hours, your dough should look puffy, bubbly, and alive.

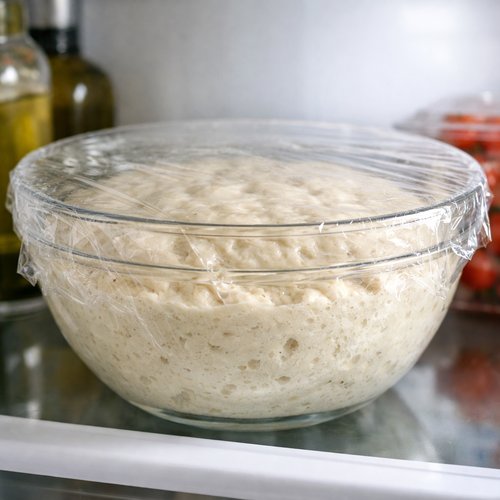
Step 3: Cold Fermentation (The Secret Ingredient)
This is where the magic truly happens. Once your dough has completed its three-hour room-temperature rise, cover the bowl (still with plastic wrap or foil) and place the entire thing into your refrigerator. Refrigerate for at least 12 hours and up to 3 days.
During this cold fermentation, the dough develops incredible flavor complexity. The yeast continues working slowly in the cold, and the gluten network strengthens naturally. The longer you can wait—up to three days—the more developed the flavor becomes. I usually make my dough on a Sunday night and bake it Wednesday or Thursday, which gives me maximum flexibility and incredible results.
Don’t panic if the dough begins to deflate after two days. This is completely normal and doesn’t mean anything went wrong. The yeast has simply continued fermenting slowly.
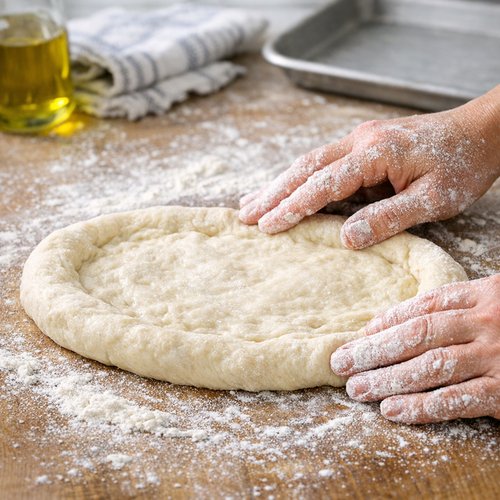
Step 4: Shape and Pre-Bake Rest
Remove your dough from the refrigerator and turn it out onto a lightly floured work surface. Your hands should be generously floured because this dough is sticky—that stickiness is what creates an open, airy crumb in the final bread.
Gently shape the dough into a ball as best you can. It doesn’t need to be perfect or symmetrical. Transfer this ball onto a large piece of parchment paper that’s safe for high heat. I use heavy-duty parchment and have never had any issues, but make sure it’s large enough to fit inside your Dutch oven.
Place the ball of dough and parchment inside a medium-size mixing bowl. This bowl acts as a guide so the dough doesn’t spread out too much while it rests. Cover the bowl loosely with plastic wrap or a kitchen towel. Let it rest for 30 minutes. During this time, the dough warms up to room temperature and puffs slightly.
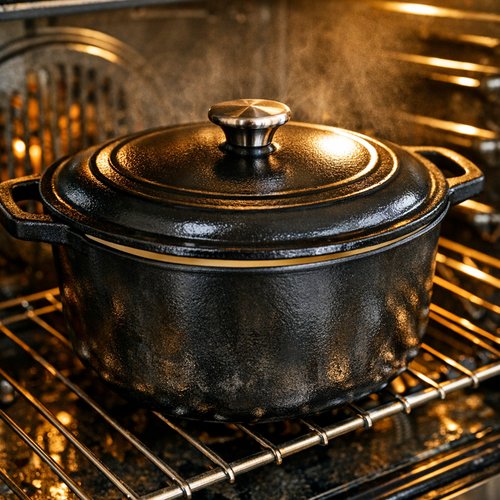
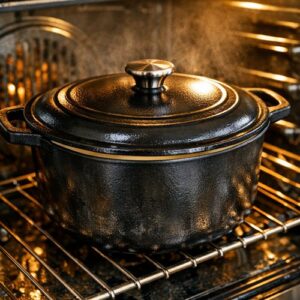
Step 5: Preheat Your Dutch Oven to Screaming Hot
While your shaped dough is resting, preheat your oven to 450°F (232°C). Yes, very hot! Place your 6-quart or larger Dutch oven with its lid inside the oven. Let it preheat for 30 minutes. You want this pot absolutely scorching hot before the dough touches it—this creates that beautiful, crispy crust you see in bakery bread.
A Dutch oven traps steam around the dough as it bakes, which keeps the crust from drying out too quickly and allows it to expand fully. This is the secret to that restaurant-quality appearance.
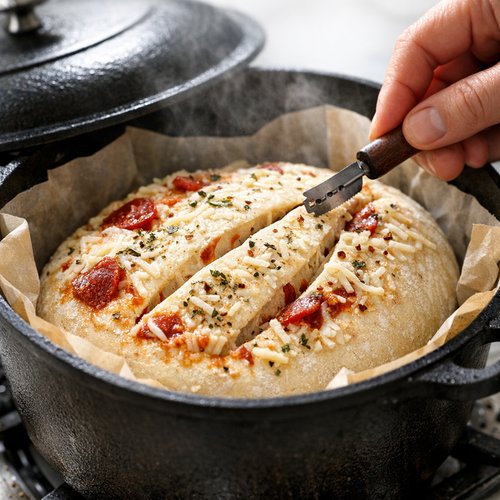
Step 6: Score and Bake with the Lid
After your 30-minute rest, remove the Dutch oven from the oven carefully—it’s extremely hot. Using a very sharp knife, bread lame, or even clean kitchen shears, score the top of your dough with an X pattern, cutting about ½ inch deep. This controlled cut allows the dough to expand gracefully and gives you that beautiful presentation.
Now carefully lift your dough and parchment together and place them directly inside the screaming-hot Dutch oven. Yes, the parchment paper goes in too. Cover the pot with its lid. Bake for 25 minutes with the lid on. You’ll hear steam hissing inside as the bread bakes. This is perfect.
After 25 minutes, carefully remove the lid using an oven mitt or kitchen towel. The steam will rush out—watch your face! You’ll see your bread has puffed up beautifully. Continue baking uncovered for 10 to 15 minutes more until the crust is golden brown. The exact time depends on your oven, so start checking around 10 minutes.
Step 7: Test for Doneness and Cool
To test if your bread is fully baked, give it a gentle tap on the bottom. If it sounds hollow, it’s done! For a more precise test, use an instant-read thermometer inserted into the center of the loaf—it should read 195°F (90°C).
Remove the pot from the oven and carefully lift the bread out using the parchment paper. Transfer it to a cooling rack. Let it cool for at least 20 minutes before slicing. I know this is hard when it smells this incredible, but this resting time lets the interior set up properly. If you slice too early, the interior might seem slightly gummy.
Because of the pepperoni, cheese, and other add-ins, this bread will be flatter than a traditional boule. Don’t worry! This just means you get a higher ratio of crispy crust to tender interior in every slice—honestly, that’s a win in my book.

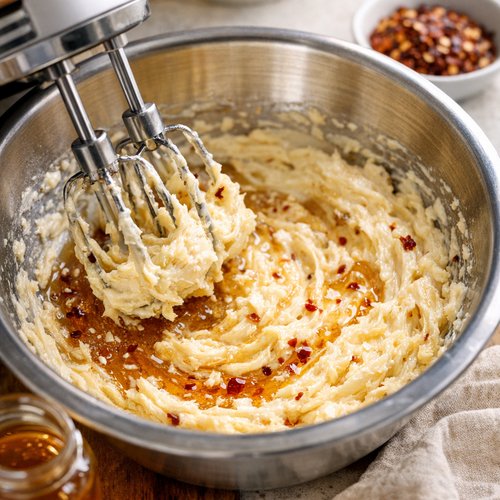
Step 8: Make Your Hot Honey Butter
While your bread cools, let’s make the honey butter that takes this bread from great to unforgettable. In a large bowl, use a handheld mixer or stand mixer fitted with a paddle attachment and beat your softened unsalted butter on medium speed until completely smooth and creamy, about 1 minute.
Add the honey and confectioners’ sugar. Starting with only ⅛ teaspoon of flaky sea salt and a small pinch of red pepper flakes, beat everything together on medium-high speed until completely smooth and combined, about 1 minute. Scrape down the sides of the bowl with a silicone spatula and beat again as needed.
Taste your butter. This is important! Add more salt and crushed red pepper flakes if you want more heat and complexity. I usually add the full ¼ teaspoon of salt because it really makes the honey shine.
Slice your cooled bread and brush or spread this hot honey butter over the warm slices. The butter will melt into all the crevices, and the honey will caramelize slightly from the residual heat. This is pure joy on bread.
Tips and Tricks from My Kitchen to Yours
- Room-temperature water matters – Water that’s too cold slows fermentation, and water that’s too hot can kill the yeast. Aim for about 70°F. If you’re unsure, use a quick-read thermometer.
- Don’t skip the long cold fermentation – I know it’s tempting to bake this sooner, but those 12 to 72 hours in the fridge are where flavor development happens. The cold fermentation creates a more complex, deeper taste that’s worth the wait.
- Use a Dutch oven for best results – This is non-negotiable for that bakery-quality crust. If you don’t have one, a covered baking dish or even an upside-down roasting pan with a baking sheet on top works in a pinch, but the Dutch oven truly is superior.
- Parchment paper prevents sticking – This dough is sticky, and parchment is your best friend. It makes transferring your shaped dough simple and ensures nothing sticks to the bottom of your pot.
- Keep pepperoni and cheese evenly distributed – Mix these in thoroughly during the initial mixing step. If they clump together, some slices will have too much and others too little.
- Trust the visual cues – A loaf thermometer is helpful, but learning to recognize a hollow tap and observing that golden-brown color are equally reliable signs of doneness.
- Save your parchment paper – After baking, let it cool and reuse it for your next loaf. I’ve used the same piece three times!
Common Mistakes to Avoid
- Not letting the dough rest long enough – If you skip or shorten the 30-minute pre-bake rest, your dough will be dense and won’t have time to fully expand. Those 30 minutes are crucial for the final rise.
- Opening the oven door during the first 25 minutes – Every time you peek, steam escapes and disrupts the baking process. Trust the timing and resist the urge to look until 25 minutes have passed.
- Skipping the cooling time – Slicing into hot bread releases steam, making the crumb seem undercooked even when it’s perfect. Those 20 minutes of cooling allow the structure to set properly so each slice is beautiful.
- Using cold water straight from the tap – Cold water can slow yeast activation. I always leave water on the counter for 30 minutes or use lukewarm tap water to ensure it’s around 70°F.
- Mixing the dough in a stand mixer – This dough is too sticky for a mixer initially. Hand mixing with a spatula creates the proper texture. Once it’s more developed, you could use a mixer, but I skip it entirely for better results.
Make-Ahead Guide: Planning for Maximum Convenience
This recipe is specifically designed for busy families, and the make-ahead timeline is one of its greatest strengths. Here’s how I plan my week around pizza bread:
Sunday Evening: Make the dough. Mix everything together and let it rise for 3 hours while I’m prepping the week. Cover and refrigerate overnight. Total active time: 15 minutes.
Monday through Wednesday: Dough is happily fermenting in your fridge, developing incredible flavor. No work needed. You can bake whenever you want during this window.
Wednesday Afternoon: I typically bake my dough on Wednesday. Shape it, let it rest 30 minutes, then bake. Fresh bread for dinner with zero stress. If you can’t bake Wednesday, no problem—the dough keeps through Thursday.
Freezing Baked Bread: Once completely cooled, wrap your baked loaf tightly in plastic wrap and then aluminum foil. Freeze for up to one month. To reheat, thaw at room temperature for two hours, then warm in a 350°F oven for 10 minutes, or toast slices individually as needed.
Freezing Honey Butter: Tightly cover leftover hot honey butter and refrigerate for up to 2-3 months. Use it on warm bread, melted over vegetables, or alongside soups.
Expert’s Nutritional Insight
As a registered dietitian, I love talking about what makes this bread nutritionally interesting. The long cold fermentation actually improves digestibility. During those 12 to 72 hours in the fridge, beneficial bacteria partially break down the gluten structure, making it easier for many people to digest compared to traditionally made bread.
The pepperoni and cheese provide protein and fat, which slow digestion and help you stay satisfied longer. A slice of this pizza bread paired with vegetables or a salad creates a balanced meal that keeps energy stable throughout the afternoon—something my kids definitely notice during school days.
The herbs aren’t just for flavor. Oregano and basil contain compounds with anti-inflammatory properties. While you’re not getting massive amounts in one slice of bread, every little bit counts toward overall wellness.
Can I Store Pizza Bread?
Yes! Storage is one of the reasons I love this recipe so much. Here’s what works in my kitchen:
Room Temperature: Store your cooled loaf loosely covered (a bread box is perfect, or drape it with a clean kitchen towel) at room temperature for up to 3 days. The crust will gradually soften, but the bread stays delicious.
Refrigerator: Place the cooled bread in an airtight container or wrap it tightly in plastic wrap and store it in the refrigerator for up to 1 week. Slice it as needed and toast before serving to refresh the crust slightly.
Freezer: Wrap the completely cooled loaf tightly in plastic wrap, then wrap again in aluminum foil. Freeze for up to 1 month. Thaw at room temperature for about 2 hours before serving, or slice while frozen and toast individual slices.
Hot Honey Butter: Tightly cover any leftover butter and store at room temperature for up to 2 days or in the refrigerator for up to 2-3 months.
Nutrition Information
Based on USDA nutritional data, each slice of pizza bread (approximately 1/8 of the loaf) contains approximately 320 calories, 14g protein, 38g carbohydrates, 13g fat, and 2g fiber. The mozzarella and pepperoni provide substantial protein content, making this bread more satisfying than plain artisan bread. One tablespoon of hot honey butter adds approximately 100 calories and 11g fat.
This bread is a good source of B vitamins from the fermented grain and selenium from the whole dough. The tomatoes (if using sun-dried) contribute lycopene, an antioxidant associated with heart health. It’s comfort food that actually nourishes your body.
What Can I Serve With Pizza Bread?
This versatile loaf plays well with so many meals. Here are my family’s favorite pairings:
- Alongside soup – Pair this with minestrone, tomato bisque, or chicken noodle soup for a complete, warming meal that feels both casual and special.
- With salad for a light dinner – Serve it with a crisp green salad or Abuelos Green Salsa drizzled over fresh greens. The bread fills you up while the vegetables keep things nutritionally balanced.
- Alongside your favorite pasta – Place a slice next to Baked Ziti Sausage or any pasta dinner. Pizza bread and pasta together feels like an Italian celebration.
- As part of a pizza night spread – Bake this bread the same day you make New York Style Pizza or New York Style Pizza Sauce from scratch. Your whole meal is homemade and absolutely delicious.
- With dips and cheeses for an appetizer spread – Slice it, toast it, and serve with hummus, olive tapenade, or whipped ricotta. It’s impressive enough for guests.
- Toasted for breakfast with butter and jam – Leftover slices are incredible toasted the next morning. The crust crackles and the interior becomes warm and tender again.
Substitutes and Variations
- Different cured meats – Swap pepperoni for diced prosciutto, crispy bacon, or chopped salami. Each brings its own personality to the bread.
- Vegetable-forward versions – Replace some of the meat with roasted red peppers, sun-dried tomatoes, spinach, or caramelized onions. Keep the total add-ins at about 1½ cups to avoid making the dough too wet.
- Different cheeses – While mozzarella is traditional, provolone, Italian blend, or even sharp cheddar work beautifully. Just make sure your cheese is shredded, not crumbled.
- Fresh herbs in place of dried – If using fresh oregano or basil, use about three times the amount of dried (about 2 teaspoons fresh per ½ teaspoon dried). Add fresh herbs during the final mixing to preserve their flavor.
- Honey instead of sugar – I often use honey instead of granulated sugar since I have it on hand. Use the same weight (about 1 teaspoon by volume).
- Active dry yeast instead of instant – These are interchangeable in this recipe. The fermentation time remains the same.
Seasonal Variations
Spring: Add fresh artichoke hearts and a handful of fresh spinach. The bright flavors celebrate the season’s new growth.
Summer: Use fresh basil (about 2 teaspoons, chopped fine) along with the dried oregano. Add chopped fresh tomatoes, but pat them dry first to avoid excess moisture. Include some crumbled goat cheese for a light, summery touch.
Fall: Incorporate roasted red peppers, sun-dried tomatoes, and crispy prosciutto. The deeper colors and caramelized flavors match the season perfectly.
Winter: Stick with the classic recipe, but consider adding a pinch of fennel seed or increasing the red pepper flakes for warming spice. Serve with hot soups and stews.
Pizza Bread Recipe
Ingredients
Method
- Grab a large mixing bowl—don't grease it—and whisk together your bread flour, instant yeast, coarse salt, sugar or honey, dried oregano, dried basil, garlic powder, and crushed red pepper flakes if using. Whisking these dry ingredients together ensures the yeast is evenly distributed and your herbs are spread throughout rather than clumping up. Now here's the key: use a silicone spatula or wooden spoon to fold in your chopped pepperoni, sun-dried tomatoes or olives, and shredded mozzarella cheese. Make sure everything is mixed evenly so you get these delicious bits in every slice. Pour in your room-temperature water. Using your spatula, gently mix everything together. The dough will look shaggy and dry at first—this is completely normal! Keep stirring and folding the dough over itself for about two minutes. You'll notice the flour gradually absorbing the water. If some flour still clings to the sides of the bowl, wet your hands slightly and gently work the dough by hand until all the flour is moistened and you have one sticky, cohesive mass. Shape it roughly into a ball in the bowl. It doesn't need to be perfect. Trust the process.
- Cover your mixing bowl tightly with plastic wrap or aluminum foil. Leave it on your counter at room temperature. Allow this to rise for exactly 3 hours. During this time, the yeast activates and the dough will roughly double in size. You'll see lots of air bubbles forming on the surface, and the dough will stick to the sides of the bowl. This is gorgeous and exactly what we want. I usually set a phone reminder for this step because I've definitely lost track of time before! After three hours, your dough should look puffy, bubbly, and alive.
- This is where the magic truly happens. Once your dough has completed its three-hour room-temperature rise, cover the bowl (still with plastic wrap or foil) and place the entire thing into your refrigerator. Refrigerate for at least 12 hours and up to 3 days. During this cold fermentation, the dough develops incredible flavor complexity. The yeast continues working slowly in the cold, and the gluten network strengthens naturally. The longer you can wait—up to three days—the more developed the flavor becomes. I usually make my dough on a Sunday night and bake it Wednesday or Thursday, which gives me maximum flexibility and incredible results. Don't panic if the dough begins to deflate after two days. This is completely normal and doesn't mean anything went wrong. The yeast has simply continued fermenting slowly.

- Remove your dough from the refrigerator and turn it out onto a lightly floured work surface. Your hands should be generously floured because this dough is sticky—that stickiness is what creates an open, airy crumb in the final bread. Gently shape the dough into a ball as best you can. It doesn't need to be perfect or symmetrical. Transfer this ball onto a large piece of parchment paper that's safe for high heat. I use heavy-duty parchment and have never had any issues, but make sure it's large enough to fit inside your Dutch oven. Place the ball of dough and parchment inside a medium-size mixing bowl. This bowl acts as a guide so the dough doesn't spread out too much while it rests. Cover the bowl loosely with plastic wrap or a kitchen towel. Let it rest for 30 minutes. During this time, the dough warms up to room temperature and puffs slightly.

- While your shaped dough is resting, preheat your oven to 450°F (232°C). Yes, very hot! Place your 6-quart or larger Dutch oven with its lid inside the oven. Let it preheat for 30 minutes. You want this pot absolutely scorching hot before the dough touches it—this creates that beautiful, crispy crust you see in bakery bread. A Dutch oven traps steam around the dough as it bakes, which keeps the crust from drying out too quickly and allows it to expand fully. This is the secret to that restaurant-quality appearance.
- After your 30-minute rest, remove the Dutch oven from the oven carefully—it's extremely hot. Using a very sharp knife, bread lame, or even clean kitchen shears, score the top of your dough with an X pattern, cutting about ½ inch deep. This controlled cut allows the dough to expand gracefully and gives you that beautiful presentation. Now carefully lift your dough and parchment together and place them directly inside the screaming-hot Dutch oven. Yes, the parchment paper goes in too. Cover the pot with its lid. Bake for 25 minutes with the lid on. You'll hear steam hissing inside as the bread bakes. This is perfect. After 25 minutes, carefully remove the lid using an oven mitt or kitchen towel. The steam will rush out—watch your face! You'll see your bread has puffed up beautifully. Continue baking uncovered for 10 to 15 minutes more until the crust is golden brown. The exact time depends on your oven, so start checking around 10 minutes.

- To test if your bread is fully baked, give it a gentle tap on the bottom. If it sounds hollow, it's done! For a more precise test, use an instant-read thermometer inserted into the center of the loaf—it should read 195°F (90°C). Remove the pot from the oven and carefully lift the bread out using the parchment paper. Transfer it to a cooling rack. Let it cool for at least 20 minutes before slicing. I know this is hard when it smells this incredible, but this resting time lets the interior set up properly. If you slice too early, the interior might seem slightly gummy. Because of the pepperoni, cheese, and other add-ins, this bread will be flatter than a traditional boule. Don't worry! This just means you get a higher ratio of crispy crust to tender interior in every slice—honestly, that's a win in my book.

- While your bread cools, let's make the honey butter that takes this bread from great to unforgettable. In a large bowl, use a handheld mixer or stand mixer fitted with a paddle attachment and beat your softened unsalted butter on medium speed until completely smooth and creamy, about 1 minute. Add the honey and confectioners' sugar. Starting with only ⅛ teaspoon of flaky sea salt and a small pinch of red pepper flakes, beat everything together on medium-high speed until completely smooth and combined, about 1 minute. Scrape down the sides of the bowl with a silicone spatula and beat again as needed. Taste your butter. This is important! Add more salt and crushed red pepper flakes if you want more heat and complexity. I usually add the full ¼ teaspoon of salt because it really makes the honey shine. Slice your cooled bread and brush or spread this hot honey butter over the warm slices. The butter will melt into all the crevices, and the honey will caramelize slightly from the residual heat. This is pure joy on bread.

Notes
FAQs
Can I make this dough without a Dutch oven?
A Dutch oven is really the ideal vessel because it traps steam so effectively, but you can work around it. Try a covered baking dish, an upside-down roasting pan with a baking sheet on top, or even a large covered cast-iron skillet. The results won’t be quite as dramatic, but they’ll still be delicious. The key is trapping steam so the bread can expand before the crust sets.
What if I don’t have time for the full 12-hour cold fermentation?
While I truly recommend the full cold fermentation for flavor development, you can bake after 8 hours if you’re in a time crunch. The bread will still be good, but it won’t have the same depth of flavor. Never skip the 3-hour room-temperature rise or the 30-minute pre-bake rest—those are essential for proper texture and rise.
Can I use whole wheat flour instead of all bread flour?
You can substitute up to 25% whole wheat flour for the bread flour, but not more than that. Whole wheat flour absorbs more water and creates a denser crumb. If you use whole wheat, increase your water by about 2-3 tablespoons to compensate.
Why is my dough so sticky, and is that normal?
Yes! This is a high-hydration dough, meaning it has a lot of water. This is exactly what creates that open, airy crumb structure with beautiful irregular holes. Use generously floured hands and a floured work surface. The stickiness is a feature, not a bug.
Can I make multiple loaves at once?
Absolutely. Simply double or triple the recipe. You’ll need a larger bowl for mixing, and you might need two Dutch ovens for baking simultaneously. Bake on separate racks, but swap their positions halfway through baking to ensure even browning.
More Recipes You’ll Love
- Adult Grilled Cheese Recipe – Elevated comfort food perfect for pairing with tomato soup and pizza bread
- New York Style Pizza – Make this bread the same day you make homemade pizza for a complete Italian feast
- New York Style Pizza Sauce – Use this sauce alongside pizza bread for ultimate flavor harmony
- Baked Ziti Sausage Recipe – A pasta main course that pairs beautifully with warm slices of pizza bread
This pizza bread recipe has genuinely changed how I approach feeding my family. It takes advantage of time in a way that feels realistic—mixing for fifteen minutes on Sunday, then fresh bread when I need it most. There’s something deeply satisfying about pulling a golden, fragrant loaf from the oven and knowing your hands created something this beautiful. I hope your family loves it as much as mine does. Happy Cooking!