
This post contains affiliate links. As an Amazon Associate I earn from qualifying purchases.
If you’ve always wanted to make a Velveeta sausage cheese dip but felt intimidated, this is your starting point. I’m going to walk you through every single step—from browning the sausage to that first creamy, delicious bite. This recipe has saved my weeknights more times than I can count, and it’s one of the first dishes families ask me to bring to gatherings. You’re not just making a dip today; you’re mastering a skill that will serve you for decades of entertaining and feeding hungry kids at home.
Over the years, I’ve helped hundreds of families in Chicago discover that restaurant-quality appetizers don’t require fancy culinary degrees or complicated techniques. In fact, some of my favorite dips come together faster than a school pickup line. This Velveeta sausage cheese dip is proof that simple, accessible ingredients create bold flavors everyone loves. Whether you’re preparing for game day, a potluck, or just a cozy family dinner, this recipe has your back.
How to Make Velveeta Sausage Cheese Dip Recipe for the First Time (You’ve Got This)
I still remember standing in my kitchen seven years ago, nervously eyeing a block of Velveeta cheese and wondering if I could actually pull off a “fancy” dip for my daughter’s school party. My mom had always made the creamy versions that disappeared in minutes, but I’d never attempted one myself. I was convinced the cheese would somehow break, that it would get lumpy, or that I’d burn the sausage beyond recognition.
I plugged in my skillet, took a deep breath, and started browning that ground sausage. Spoiler alert: it worked beautifully. By the time I’d stirred in the melted cheese and that hit of lime juice, I realized I’d been overthinking everything. The flavors balanced perfectly, the texture was silky smooth, and my family finished the entire batch in under fifteen minutes. That’s when I knew this would become my go-to recipe for any gathering.
What surprised me most wasn’t how good it tasted—it was how much confidence that single recipe gave me. Suddenly, I wasn’t nervous about hosting game nights or contributing to potlucks. I had a reliable, delicious appetizer that my kids would actually eat alongside the adults. That feeling of kitchen confidence matters more than any ingredient in this dip.

What to Expect Before You Start
Let’s set realistic expectations so you walk into this with eyes wide open. This dip takes about twenty-five to thirty minutes from start to finish, with most of that time being hands-on. You’re not standing around waiting for something to bake or chill. The difficulty level is genuinely beginner-friendly—if you can brown ground meat and stir, you can make this.
The most important thing you need is a large skillet and patience during the cheese-melting stage. Don’t rush it. Medium heat is your friend here. I’ve seen folks crank their burners to high and end up with a grainy, separated mess. We’re going slow and steady so the Velveeta becomes that gorgeous, creamy texture everyone expects.
Success looks like a smooth, pourable dip that coats the back of a spoon but still moves around the pan when you tilt it. It should smell like savory, salty comfort with a hint of lime and those toasted spice notes from the sausage. Your guests will know within seconds that something special is happening in that skillet.
- Hands-on time is quick and straightforward—about five minutes of active cooking for the sausage, then another eight to ten minutes for melting the cheese. Even if this is your first time cooking sausage, you’ll see clear visual signs when it’s done. The color changes from pink to brown, and the texture becomes crumbly.
- You don’t need fancy equipment or prior dip-making experience—beginners often worry they’ll mess up the cheese melting or create a broken, oily mess. That fear comes from unfamiliarity, not reality. With medium heat and constant stirring, the Velveeta melts into a silky sauce every single time.
- This recipe is forgiving and flexible—if you want it spicier, grab the medium or hot Ro-Tel. If you prefer it milder, stick with the mild version. The lime juice can be adjusted to your taste. There’s room for personal preference here.
Equipment You’ll Need (And What You Can Skip)
Here’s the beautiful truth: you don’t need a thing beyond what’s already in your kitchen. No special dip maker, no fancy slow cooker insert, no complicated gadgets. Let me share what actually matters.
- One large skillet (12-inch preferred)—this is your workhorse for browning the sausage and melting the cheese. Stainless steel, nonstick, cast iron—it truly doesn’t matter. What matters is size. A large surface area means the sausage cooks evenly without crowding, and later, you’ll have plenty of room to stir without sloshing cheese everywhere.
- A sturdy wooden spoon or silicone spatula—something heat-resistant that won’t scratch your pan and won’t melt. You’ll be stirring constantly during the cheese stage, so comfort matters. Your wrist will thank you if the handle is a reasonable length.
- A cutting board and knife—for cubing the Velveeta cheese into manageable pieces. This step takes about two minutes and makes the melting process dramatically faster. Trust me on this.
- A measuring spoon and cup—for the evaporated milk, butter, and spices. Standard kitchen measuring tools work perfectly.
- Optional: a slow cooker—if you’re making this for a party and want to keep it warm during serving time, you can transfer the finished dip to a slow cooker set on low. It will stay creamy and warm for hours. But this is truly optional; you can serve it straight from the skillet into a bowl.
- Optional: a lime juicer—makes extracting fresh lime juice easier, but a fork or your hands work just fine if that’s all you have.
The Ingredients: A Beginner’s Shopping Guide
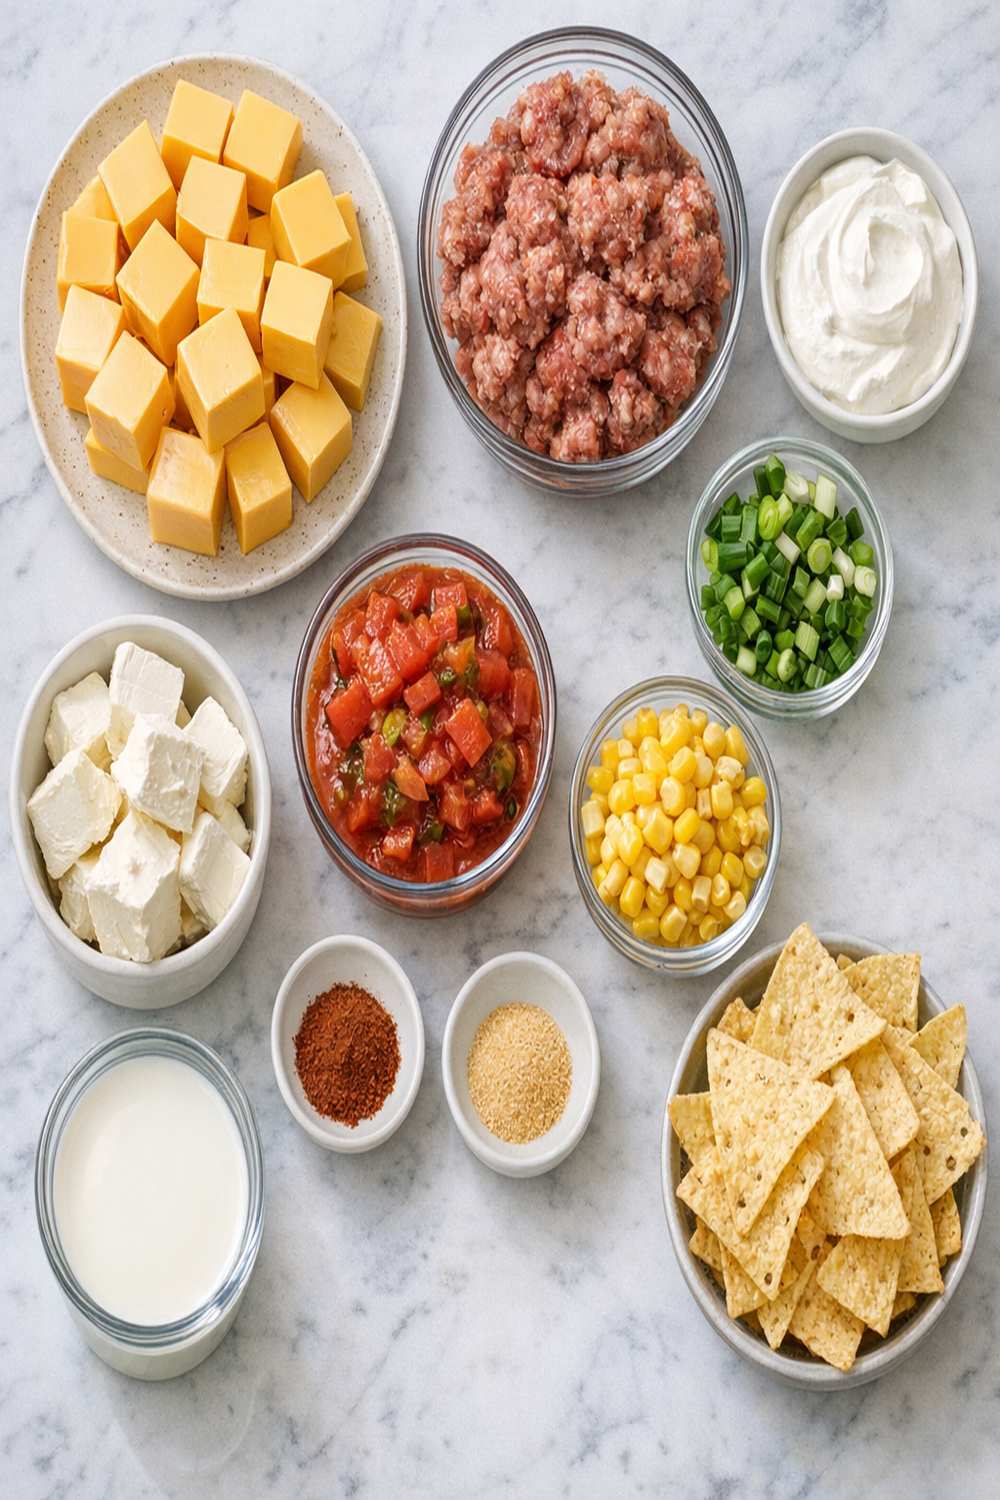
Shopping for these ingredients is one of the easiest parts of this recipe. Everything lives in regular grocery stores—nothing exotic or specialty here. I’m going to walk you through where to find each item and what to look for when you’re standing in the aisle.
The Main Players
- 2 tablespoons butter (salted or unsalted, both work; from the refrigerated section where you find regular dairy butter)
- 1 pound ground breakfast sausage (look for the packages labeled “breakfast sausage” in the meat department; it’s seasoned and ready to cook, usually found near the ground beef and ground turkey)
- 1 can evaporated milk, 12 ounces (in the baking aisle near condensed milk and sweetened cream; it’s thicker and richer than regular milk, which is why it creates that creamy sauce)
- 1 block Velveeta cheese, 32 ounces (found in the dairy section, usually shelved near the block cheddar and mozzarella; it’s the bright orange, processed cheese that melts like a dream)
The Seasonings & Finishers
- 1 fresh lime (produce section; look for limes that yield slightly to gentle pressure—that means they’re juicy and ready to use)
- 1 teaspoon garlic powder (in the spice aisle; a tiny bottle lasts months—this powder adds savory depth without being overwhelming)
- 2 teaspoons olive oil (pantry staple; any basic olive oil works fine for browning the sausage)
- ¼ teaspoon ground cumin (spice aisle; this gives the dip a subtle warmth and complexity that guests never quite identify but always love)
- 1 can Ro-Tel tomatoes and green chilies, 10 ounces (typically in the Mexican foods aisle or near the canned tomatoes; comes in mild, medium, and spicy—pick your heat level)
- 1 teaspoon onion powder (same spice aisle as garlic powder; adds sweetness and umami that makes people keep coming back for more)
Here’s a pro tip from my nutrition background: the Velveeta cheese might not be what you’d serve as a cheese board cheese, but for melting purposes, it’s technically superior to block cheddar. It contains emulsifiers that keep it creamy and smooth without separating, even as it cools slightly. That’s why this recipe works so reliably.
Step-by-Step: Your First Velveeta Sausage Cheese Dip Recipe
You’ve got your ingredients, your equipment, and your confidence. Now let’s build this dip from the ground up. I’m going to be extremely detailed because I remember exactly what confused me when I first started cooking sausage. You’ve got this.
Step 1: Prepare Your Workspace and Ingredients
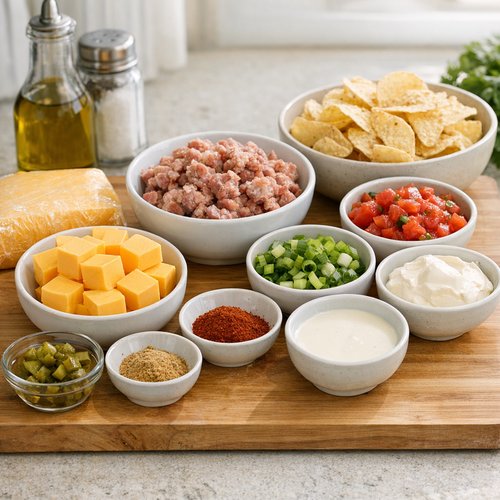
Before you turn on a single burner, I want you to do what I call a mise en place—a French cooking term that just means “everything in its place.” This takes three minutes and prevents panicked scrambling later.
Take out your Velveeta cheese block and cut it into rough cubes about the size of dice. They don’t need to be perfect—you’re just breaking the large block into smaller pieces so it melts faster and more evenly. As you’re cutting, you might notice the cheese is waxy and holds its shape. That’s exactly what you want. Place these cubes in a small bowl or plate nearby.
Measure out your evaporated milk, butter, garlic powder, onion powder, and cumin into separate small bowls or onto a plate. Cut your lime in half and set it near your stove. Pour your olive oil into a small container you can easily access. This setup means you’re never searching for an ingredient mid-cook.
Step 2: Brown the Ground Sausage
Place your large skillet on the stovetop and turn the heat to medium-high. Add your two teaspoons of olive oil and let it warm for about one minute. You’ll see it shimmer slightly and smell the faint olive aroma. Don’t skip the oil—it prevents sticking and helps brown the sausage evenly.
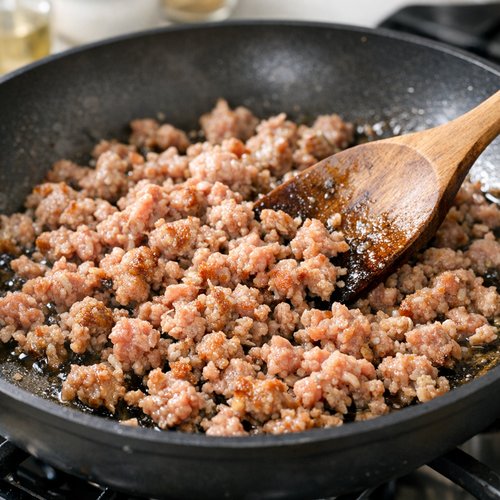
Now add your pound of ground sausage to the hot oil. It will hit the pan with an immediate sizzle. This is the sound of cooking happening. Use your wooden spoon to break the sausage into smaller, bite-sized pieces. You’re not mashing it flat—you’re crumbling it so it cooks through quickly and evenly. As you stir, the meat will gradually change color from pink to light brown, then to a deeper brown.
This browning process takes six to eight minutes. You’re looking for no visible pink and crumbly, cooked-through texture. The sausage should smell savory and toasted, like breakfast. When you’re confident there’s no pink remaining, take a piece out with your spoon and let it cool slightly, then taste it. It should taste fully cooked, not raw or mushy.
Once the sausage is cooked through, use a slotted spoon to transfer it to a clean plate, leaving as much grease behind as possible. Drain off most of the remaining fat from the skillet, leaving just a light coating. Excess grease will make your final dip greasy and separate, which we don’t want.
Step 3: Create Your Creamy Cheese Sauce
Return the skillet to medium heat—and here’s where patience becomes your greatest ingredient. Do not jump to medium-high or high heat. Medium is your sweet spot. Add your cubed Velveeta cheese to the warm skillet along with your measured butter.
The cheese will start to soften and collapse within seconds. This is normal and beautiful. As it warms, use your wooden spoon to stir constantly, gently breaking the cheese pieces apart as they melt. Do not walk away from this skillet. Constant stirring is what prevents lumps and ensures silky smoothness.
After about three minutes of stirring, the cheese will look mostly melted but might have a few stubborn chunks. This is the moment to add your evaporated milk. Pour it slowly while stirring continuously. The milk will combine with the melted cheese and create an even creamier sauce.
Continue stirring for another three to four minutes. The cheese might look slightly grainy for a moment—this is absolutely fine and temporary. As you keep stirring and the heat distributes, it smooths out into that gorgeous, velvety texture you’re after. The finished sauce should coat the back of your spoon but still move freely when you tilt the pan.

Step 4: Add Spices for Depth and Flavor
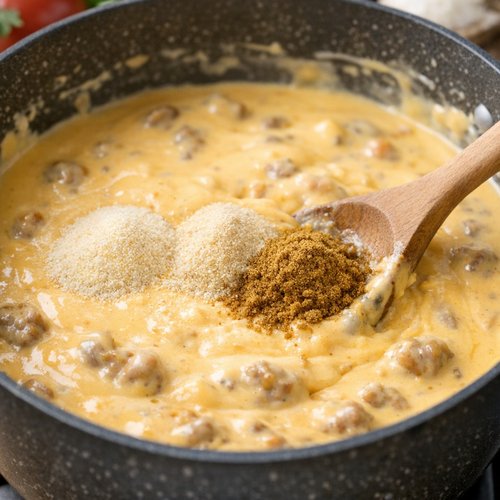
Once your cheese sauce looks smooth and creamy, add your garlic powder, onion powder, and cumin. Pour them in and stir immediately. These spices will incorporate quickly and completely, and your kitchen will smell absolutely incredible. The combination of garlic, onion, and cumin creates savory depth that makes this dip taste like you spent hours developing the flavors—even though you’ve only been cooking for twelve minutes.
Stir for about one minute, making sure every spice is fully incorporated and you don’t see any specks of powder sitting on top of the sauce.
Step 5: Return the Sausage and Add the Ro-Tel
Scrape your cooked sausage from the plate back into the skillet with the melted cheese sauce. Stir gently to combine so every piece of sausage gets coated with the creamy sauce. This takes about one minute of gentle stirring.
Now pour in your entire can of Ro-Tel tomatoes and green chilies, juice included. Don’t drain them—all that liquid becomes part of your sauce and adds flavor. Stir until the Ro-Tel is evenly distributed throughout the dip. The color will shift to a slightly more orange-red, and you’ll see little pieces of roasted tomato and green chili throughout.

Step 6: Finish with Fresh Lime and Serve
Squeeze the juice from both lime halves into your dip. Fresh lime juice is non-negotiable here—it brightens the entire dish and adds a subtle tartness that prevents the dip from tasting flat or too heavy. If you have a lime juicer, use it. If not, squeeze it by hand and catch any seeds with your fingers.
Reduce your heat to low and stir everything together for about one final minute. The dip is technically done, but this last minute of gentle cooking helps all the flavors marry together.
Taste a tiny spoonful. Does it taste balanced—salty, savory, with a hint of spice and that bright lime finish? If it needs more salt, add a pinch. If it’s too hot, you can add a tiny splash more evaporated milk to cool it down.
Transfer your dip to a serving bowl or keep it warm in a slow cooker on the low setting. Serve immediately with tortilla chips, warm pita, fresh vegetables, or sliced bread. The dip is best served within fifteen minutes of finishing, while it’s still hot and has that perfect creamy consistency.

How to Tell If You Did It Right
Success with this recipe is obvious once you know what to look for. Let me give you the exact signs that tell you everything went perfectly.
- The sausage is fully cooked and crumbly—you see zero pink, the pieces are broken into small pieces, and it smells like savory, toasted breakfast. When you taste a piece, it’s tender and fully cooked, not mushy or grainy.
- The cheese sauce is smooth and creamy—no lumps, no graininess, no oily separation. When you dip a chip and pull it out, the sauce clings to the chip without being so thick it’s hard to bite through. It pours easily but holds together when cooled for a few minutes.
- The flavors are balanced—you taste savory sausage, creamy cheese, that subtle warmth from the spices, and a bright finish from lime juice and Ro-Tel. No single flavor dominates. It makes you want another chip immediately.
- The color is consistent throughout—a warm orange-red without any white streaks of unmelted cheese or pools of separated butter sitting on top. Everything is integrated and unified.
- The texture is pourable but not liquidy—it flows slowly from a spoon rather than immediately splattering everywhere. But it’s not so thick it’s hard to scoop with a chip.
What Went Wrong? Beginner Fixes
Even with perfect instructions, things sometimes don’t go as planned. Here are the most common issues I see, and exactly how to fix them.
- The cheese looks grainy or separated (oil pooling on top)—this happens when the heat was too high or when you stopped stirring. Fix: reduce heat to low immediately and add a splash of evaporated milk while stirring constantly. The milk will help re-emulsify the sauce. Keep stirring for two to three minutes until it looks smooth again. For next time: stay at medium heat and never stop stirring during the cheese stage.
- The sausage tastes bland or underseasoned—breakfast sausage is usually pre-seasoned, but some brands are milder than others. If yours tastes flat, add a pinch of salt and a tiny dash of black pepper when you return it to the cheese. You can also add a quarter teaspoon of additional garlic powder. Taste as you go.
- The dip is too thick and hard to scoop—this usually means the ratio of liquid to cheese is off, or it’s cooled down too much. Fix: stir in a quarter cup of additional evaporated milk and warm gently over low heat for a minute. This will loosen it up to perfect scooping consistency. For next time: serve immediately while hot, or keep it in a slow cooker on low to maintain temperature.
- The dip is too thin and soupy—you used too much evaporated milk or Ro-Tel juice. Fix: mix one tablespoon of cornstarch with two tablespoons of cold water, then slowly stir this mixture into your dip while heating over medium-low, stirring constantly. This thickens it without adding more cheese. The dip will thicken more as it cools slightly.
- There’s a burnt, scorched taste—the heat was too high at some point. Unfortunately, there’s no fix for burnt dip except making a fresh batch. But now you know: medium heat, constant stirring, patience. The three rules of cheese sauce success.
Expert’s Nutritional Tip: Why This Dip Works Nutritionally
As a registered dietitian, I need to be honest with you: this is a rich, indulgent appetizer, and that’s okay. It’s not meant to be a health food—it’s meant to be a celebration food. But let me share why it’s better balanced than you might think.
The ground sausage provides protein and fat that keeps you satisfied longer than you’d expect from a dip. That protein helps offset the pure carbohydrates in tortilla chips, which means you’re less likely to eat mindlessly. The Ro-Tel tomatoes and green chilies add actual vegetables and capsaicin (the compound that makes peppers spicy), which boosts metabolism slightly. The lime juice provides vitamin C and brightens the overall flavor profile, reducing your need to eat massive quantities to feel satisfied.
The evaporated milk is the secret weapon here. It’s more nutrient-dense than regular milk and creates creaminess without extra fat. One serving of this dip is roughly two tablespoons, which is satisfying enough with a few chips.
My advice: serve this as part of a balanced spread. Include fresh vegetables, a simple salad, and grilled proteins alongside it. When families see this dip as one option among many, they naturally eat more moderately and enjoy it without guilt.
Make-Ahead Guide: Prep and Serving Strategies
I always tell busy parents that the smartest cooking is the cooking you prepare in advance. Let me walk you through exactly how to prep this dip ahead of time.
Up to Two Days Before
Chop and cube your Velveeta cheese. Store it in an airtight container in the refrigerator. This saves you three minutes on game day and means you’re not standing there with a knife when guests are arriving.
Brown the sausage completely. Let it cool, then store it in an airtight container in the refrigerator. You can reheat it gently in a skillet before assembling the dip, or add it cold to the melted cheese—the heat will warm it through perfectly.
Measure your spices into a small bowl. Keep them at room temperature. This ensures you don’t accidentally skip a spice during the busy final stage of cooking.
One Hour Before Serving
Gather all your ingredients and equipment at the stove. Set up your workspace exactly as I described in the step-by-step section. When guests arrive, you’re just minutes away from serving.
Cut your lime fresh. Fresh lime juice makes a huge difference. If you cut it hours ahead, it oxidizes and loses some brightness.
Serving and Keeping Warm
If you’re making this for an event and need it to stay warm for an hour or more, transfer the finished dip to a slow cooker set on the low setting. The low, gentle heat maintains the creamy texture without further cooking the ingredients. Stir it every fifteen to twenty minutes to keep the texture even and prevent any settling.
If you’re serving it straight from the skillet, you have about thirty minutes before the texture starts to thicken as it cools. If you need it warmer, place the skillet on a burner set to the absolute lowest heat, stirring occasionally.
Seasonal Variations: Making This Dip Throughout the Year
This basic dip is so versatile that you can adapt it for any season or flavor craving. Here are my favorite variations:
Spring & Summer Version
Add fresh cilantro and jalapeño. After the dip is finished, stir in two tablespoons of fresh cilantro and one diced fresh jalapeño (seeds removed if you don’t want extreme heat). The brightness feels perfect for warm months.
Fall & Winter Version
Add smoked paprika and crispy bacon. Stir in one teaspoon of smoked paprika in place of the regular spices, and top the finished dip with three tablespoons of crispy, crumbled bacon. The smokiness feels cozy and seasonal.
Fiesta Version
Add black beans and corn. Stir in one half-cup of rinsed black beans and one half-cup of corn (frozen or fresh) along with the Ro-Tel. You’ll get more texture and vegetable nutrition.
Creamy Chorizo Version
Use chorizo instead of breakfast sausage. Chorizo is spicier and more deeply flavored. This works beautifully with the lime and gives you a more sophisticated flavor profile.
Your Next Steps After Mastering This
Once you’ve made this dip successfully, you’ve learned foundational skills that apply to dozens of other dishes. You now understand how to brown ground meat evenly, how to melt cheese smoothly without breaking it, and how to balance flavors with acids and spices. These skills transfer directly to Best Sloppy Joes Recipe, which uses the same browning technique with sausage or ground beef.
You can also build on this foundation by making Best Mac And Cheese Recipe, which uses similar cheese-melting techniques but with pasta. Or explore Cincinnati Chili Recipe, which builds on your sausage-browning skills in a completely different direction.
The confidence you gained by successfully making this dip is the real success here. You proved to yourself that you can follow instructions, execute technique, and create something delicious from basic ingredients. That’s the real skill.
Can I Store Velveeta Sausage Cheese Dip Recipe?
Yes, this dip stores beautifully, and here’s exactly how to handle it.
In the Refrigerator
Leftover dip keeps for up to four days when stored in an airtight container. Let it cool to room temperature before covering, then refrigerate. The texture will thicken significantly as it cools—this is completely normal and expected.
To reheat: transfer the dip to a skillet and warm gently over low heat, stirring constantly and adding a splash of evaporated milk if needed to return it to scoopable consistency. You can also reheat it in the microwave in thirty-second intervals, stirring between each interval.
In the Freezer
This dip freezes well for up to two months. Cool it completely, transfer it to a freezer-safe container (I prefer flat containers that thaw faster), and freeze. Label it with the date.
To thaw and reheat: move it to the refrigerator the night before you need it, allowing it to thaw slowly. Then reheat using the skillet method above. The texture might be slightly separated when you reheat, but constant stirring over gentle heat brings it back together beautifully.
Not Recommended
I don’t recommend keeping this dip at room temperature for more than two hours. The sausage contains meat, and food safety guidelines recommend not leaving meat-containing dishes out longer than that.
Nutrition Information
Based on USDA database analysis, one serving (approximately two tablespoons of dip with a handful of tortilla chips) contains:
- Calories: 180-200 per serving
- Protein: 8-10 grams (from sausage and cheese)
- Fat: 12-14 grams (mostly saturated from cheese and sausage)
- Carbohydrates: 8-10 grams (if served with chips; the dip itself is very low-carb)
- Sodium: 450-500 mg (from sausage, cheese, and Ro-Tel)
- Calcium: 200-250 mg (from cheese, roughly 20% of daily value)
This makes approximately twelve to sixteen servings. The dip itself (without chips) is very low in carbohydrates and higher in protein and fat, which means it keeps you satisfied longer than pure carbohydrate appetizers.
What Can I Serve With Velveeta Sausage Cheese Dip Recipe?
The beauty of this dip is its versatility. Here are my favorite serving options that complement the flavors perfectly:
- Tortilla chips—the classic choice. Serve them warm or at room temperature. Warm chips absorb the dip better and create a more satisfying bite.
- Fresh vegetables—bell peppers, cucumber slices, celery sticks, and cherry tomatoes all provide cool, crisp contrast to the warm, creamy dip. This also adds vegetables to your spread, which I always appreciate as a dietitian.
- Warm pita bread or naan—slice them into triangles and serve warm. The bread’s slight chewiness pairs beautifully with the creamy dip.
- Pretzel crisps or crackers—for guests who want something less oily than tortilla chips, these are perfect vessels for scooping.
- Sliced jalapeños or banana peppers—if you want extra spice, these add a peppery kick that complements the dip’s flavors.
- Serve alongside Pizza Bread Recipe—both are warm, savory appetizers that work beautifully together for game day or parties.
- Combine with Refrigerator Pickles Recipe—the tangy pickles provide amazing flavor contrast to the creamy, savory dip.

Velveeta Sausage Cheese Dip Recipe
Ingredients
Method
- Before you turn on a single burner, I want you to do what I call a mise en place—a French cooking term that just means "everything in its place." This takes three minutes and prevents panicked scrambling later. Take out your Velveeta cheese block and cut it into rough cubes about the size of dice. They don't need to be perfect—you're just breaking the large block into smaller pieces so it melts faster and more evenly. As you're cutting, you might notice the cheese is waxy and holds its shape. That's exactly what you want. Place these cubes in a small bowl or plate nearby. Measure out your evaporated milk, butter, garlic powder, onion powder, and cumin into separate small bowls or onto a plate. Cut your lime in half and set it near your stove. Pour your olive oil into a small container you can easily access. This setup means you're never searching for an ingredient mid-cook.

- Place your large skillet on the stovetop and turn the heat to medium-high. Add your two teaspoons of olive oil and let it warm for about one minute. You'll see it shimmer slightly and smell the faint olive aroma. Don't skip the oil—it prevents sticking and helps brown the sausage evenly. Now add your pound of ground sausage to the hot oil. It will hit the pan with an immediate sizzle. This is the sound of cooking happening. Use your wooden spoon to break the sausage into smaller, bite-sized pieces. You're not mashing it flat—you're crumbling it so it cooks through quickly and evenly. As you stir, the meat will gradually change color from pink to light brown, then to a deeper brown. This browning process takes six to eight minutes. You're looking for no visible pink and crumbly, cooked-through texture. The sausage should smell savory and toasted, like breakfast. When you're confident there's no pink remaining, take a piece out with your spoon and let it cool slightly, then taste it. It should taste fully cooked, not raw or mushy. Once the sausage is cooked through, use a slotted spoon to transfer it to a clean plate, leaving as much grease behind as possible. Drain off most of the remaining fat from the skillet, leaving just a light coating. Excess grease will make your final dip greasy and separate, which we don't want.

- Return the skillet to medium heat—and here's where patience becomes your greatest ingredient. Do not jump to medium-high or high heat. Medium is your sweet spot. Add your cubed Velveeta cheese to the warm skillet along with your measured butter. The cheese will start to soften and collapse within seconds. This is normal and beautiful. As it warms, use your wooden spoon to stir constantly, gently breaking the cheese pieces apart as they melt. Do not walk away from this skillet. Constant stirring is what prevents lumps and ensures silky smoothness. After about three minutes of stirring, the cheese will look mostly melted but might have a few stubborn chunks. This is the moment to add your evaporated milk. Pour it slowly while stirring continuously. The milk will combine with the melted cheese and create an even creamier sauce. Continue stirring for another three to four minutes. The cheese might look slightly grainy for a moment—this is absolutely fine and temporary. As you keep stirring and the heat distributes, it smooths out into that gorgeous, velvety texture you're after. The finished sauce should coat the back of your spoon but still move freely when you tilt the pan.

- Once your cheese sauce looks smooth and creamy, add your garlic powder, onion powder, and cumin. Pour them in and stir immediately. These spices will incorporate quickly and completely, and your kitchen will smell absolutely incredible. The combination of garlic, onion, and cumin creates savory depth that makes this dip taste like you spent hours developing the flavors—even though you've only been cooking for twelve minutes. Stir for about one minute, making sure every spice is fully incorporated and you don't see any specks of powder sitting on top of the sauce.

- Scrape your cooked sausage from the plate back into the skillet with the melted cheese sauce. Stir gently to combine so every piece of sausage gets coated with the creamy sauce. This takes about one minute of gentle stirring. Now pour in your entire can of Ro-Tel tomatoes and green chilies, juice included. Don't drain them—all that liquid becomes part of your sauce and adds flavor. Stir until the Ro-Tel is evenly distributed throughout the dip. The color will shift to a slightly more orange-red, and you'll see little pieces of roasted tomato and green chili throughout.

- Squeeze the juice from both lime halves into your dip. Fresh lime juice is non-negotiable here—it brightens the entire dish and adds a subtle tartness that prevents the dip from tasting flat or too heavy. If you have a lime juicer, use it. If not, squeeze it by hand and catch any seeds with your fingers. Reduce your heat to low and stir everything together for about one final minute. The dip is technically done, but this last minute of gentle cooking helps all the flavors marry together. Taste a tiny spoonful. Does it taste balanced—salty, savory, with a hint of spice and that bright lime finish? If it needs more salt, add a pinch. If it's too hot, you can add a tiny splash more evaporated milk to cool it down. Transfer your dip to a serving bowl or keep it warm in a slow cooker on the low setting. Serve immediately with tortilla chips, warm pita, fresh vegetables, or sliced bread. The dip is best served within fifteen minutes of finishing, while it's still hot and has that perfect creamy consistency.

Notes
FAQs
Can I make this dip without Velveeta cheese?
You can technically substitute sharp cheddar or American cheese, but the results won’t be identical. Velveeta melts smoother than block cheese because it contains emulsifiers that prevent separation. If you use block cheddar, you might end up with a slightly grainier texture and need to add more evaporated milk to keep it creamy. My advice: Velveeta is inexpensive and does this job perfectly, so I recommend sticking with it for this particular recipe. If you have dietary restrictions preventing Velveeta, I’d be happy to suggest alternatives—just ask.
What kind of sausage should I use?
I specifically recommend breakfast sausage because it’s pre-seasoned and more finely ground than Italian sausage, which means it cooks quickly and distributes evenly throughout the dip. Italian sausage tends to be chunkier and more heavily seasoned, which can overpower the other flavors. If breakfast sausage isn’t available, ground beef works in a pinch, though you’ll want to add an extra pinch of salt and half a teaspoon of garlic powder to compensate for the sausage’s seasoning.
Can I make this in a slow cooker from start to finish?
I don’t recommend this. The sausage browns better in a hot skillet than in a slow cooker, where it tends to steam rather than brown. The cheese also melts better with direct heat control. My approach: brown the sausage in a skillet, then transfer everything to a slow cooker on low for the final five to ten minutes if you need to time it with something else, or for keeping it warm during serving. The stovetop method gives you the best flavor and texture.
What if I don’t have fresh lime?
Fresh lime is genuinely important for brightening the flavors, but if you’re absolutely without, you can substitute fresh lemon juice (a bit more t
- Dinner Recipes